Backup as a service - BaaS
Description of the service
SIM-Cloud BaaS (Backup as a Service)
SIM-Cloud BaaS – is a unique integrated backup service provided by SIM-Networks that has been specially devised for quickly creating and securely storing backup copies of data. The encapsulation of the service within the existing SIM-Cloud architecture results in high levels of performance and ease of use.
The SIM-Cloud BaaS backup service is designed to provide protection for data on virtual servers (instances) running in SIM-Cloud (IaaS).
Where necessary, SIM-Cloud BaaS helps you restore data of a volume and the operation of an instance.
The SIM-Cloud Dashboard is a convenient web interface for configuring and managing backup copies and allows you to perform the following basic actions:
- Create backup plans for one or multiple volumes;
- Create backup copies on remote and local storage;
- Manage restore points (backup copies);
- Perform data recovery;
- Monitor the status of tasks in progress;
- Check the disk quota being used for backup storage;
- Check for efficient use;
- Set up and mange the BaaS notification service;
- Review the history of executed tasks.
How it works
The method of creating backups used here is based on that for creating snapshots of volumes (disks) using incremental data backup. Compared with traditional methods of creating backups, this service generates considerably less load and also allows the use of considerably less disk space.
This approach enables clients to use BaaS more effectively by creating a larger number of restore points.
To create a backup copy of the volume, a backup plan must be made to which the required disks are added and a scheduler is configured in which the times of creating restore points is specified together with the number of such points and the backup storage is specified in which the backup copies of the disk are to be stored.
Here a closer look is taken at the principle of operation of the backup service to facilitate a more detailed understanding.
While executing the backup plan for the first time, the BaaS service creates a complete disk backup (full snapshot).
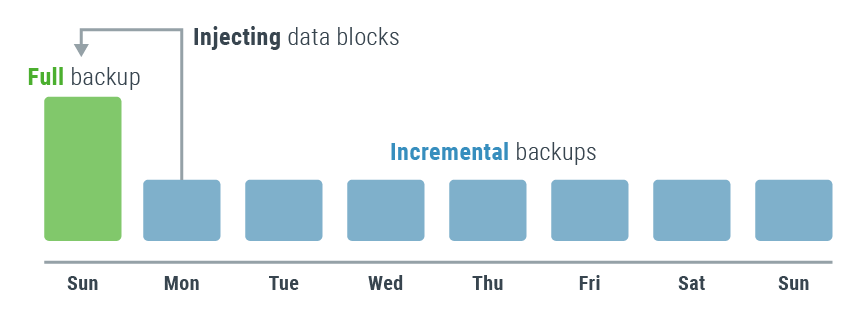
Creating a full snapshot involves creating a ‘slice’ of the disk with a description of the logical blocks and also of the actual data that is stored on the disk in the format of the blocks.
Our backup service only backs up disk space that is actually used and not the entire volume, which also enables the client to use the disk quota for backup space more judiciously. On subsequent executions of the same backup plan for the same disk, an incremental backup is created. This means that only those data, or more precisely those blocks are backed up that have changed since the time of the last successful execution of the task of creating a restore point.
After each snapshot of the disk is created, the data are moved to local or remote storage, depending on the configuration of the backup plan. For the client, the backup operation remains practically unnoticeable, or transparent. It is helpful to understand that the first launch of the backup plan, at which time the full copy of the volume is made, requires significantly more time than the subsequent incremental restore points. This can be explained by the different volumes of data that have to be transferred and written to the backup storage.
The process of creating restore points creates a series of interlinked snapshots. Thus, each new restore point is a logical continuation of the previous. Severing this linkage by excluding the disk from the backup plan or adding the disk again and launching the backup plan becomes impossible since the service detects existing snapshots but cannot continue to create incremental backups due to the lack of internal links. The principle described here lies at the root of working with snapshots and amounts to a technical limitation. To recover the operation of the backup plan it is sufficient to delete the old backup copy and launch the plan again.
An understanding of the algorithm by which such a sequence is formed helps in understanding the fine details and specifics of creating restore points and also in correctly using the mechanism for restoring from backup disks in future.
It is also worth pointing out that this method of backing up is indispensable for situations in which the system fails completely. The service proved itself particularly during the time that cases of full encryption were becoming more frequent. In such cases, when there is sufficient number of restore points, it is easy to restore all data and the operation even of virtual systems.
The BaaS service uses two independent storage areas:
- Local storage
- Remote storage.
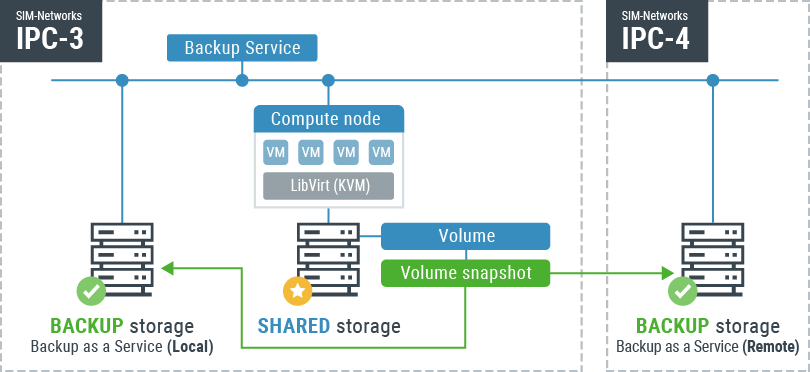
Each of the two storages has the same architecture and is based on the software-defined storage (SDS) provided by Ceph using SATA HDDs. They differ only in their physical location.
In spatial terms the local storage is operated in the same data centre as the basic SIM-Cloud infrastructure. The chief benefit of local storage is its high retrieval speed, and consequently, rapid recovery of data from backups. However, the use of local storage does not protect the data from unforeseen situations of a man-made nature.
The remote storage is housed in a separate, remote data centre (DC). This means that backup copies of our clients’ data are stored in a physically separate DC. Thanks to the geographical spread of the data and backup copies, reliable protection is obtained from unforeseen force-majeure incidents (disasters, human error, man-made disasters and the like). In the case of the remote storage, the data is given a high level of protection but in comparison to local storage the speed of data recovery from the backup is slower.
The option of using either local or remote storage provides the choice between high-performance data recovery and secure data storage.
Performance
The architectural solution implemented in our service allows retrieval of some 100-600 GB per hour, depending on the type of backup storage.
Remote storage allows recovery at 100-150 GB per hour. Local backup has significantly higher performance - 300-600 GB/hour. This high speed of retrieval is obtained thanks to a lack of transmission losses sending the data over the network.
There is no difference between the types of data processed by the service. In essence a recovery point is created as a slice of the client’s system status and file system with data blocks. A backup copy is created on the basis of a disk and a defined instance, and so the recovery from the backup also takes place at disk level. For this reason, SIM-Cloud BaaS can be applied equally effectively with all types of infrastructure services, be they a web server, a database server, a mail server or an ordinary home operating system.
Note
Storing backup copies ‘on site’ helps increase the speed of expanding large volumes of data several times over, which significantly reduces the time required for recovery. This option is orientated in the first instance to clients whose data is of the order of terabytes: with smaller archive volumes (up to 200 GB) the difference in speed is less noticeable.
Benefits of SIM-Cloud BaaS
- Reliable protection (with the possibility of storing backups at a remote data centre)
- Fast activation (in one working day)
- Fast recovery speed (high RPO and RTO indicators)
- Secure data transmission (secure communication channels used)
- High availability (24/7/365)
- Reduces management outlay
- Ease of use (configuration and management via convenient SIM-Cloud dashboard)
- Effective use of disk quota (saving time and disk space thanks to the use of incremental backups)
- Notification when backup plans are in use
Accessibility
The SIM-Cloud BaaS service is available to our clients online 24/7/365 from any place in the world; all you need is an Internet connection. Access to the BaaS web interface is via a web browser (Google Chrome, Opera, Mozilla Firefox, Microsoft Edge and others).
To make use of the service, go to the relevant entry of the IaaS SIM-Cloud menu: - «BaaS.
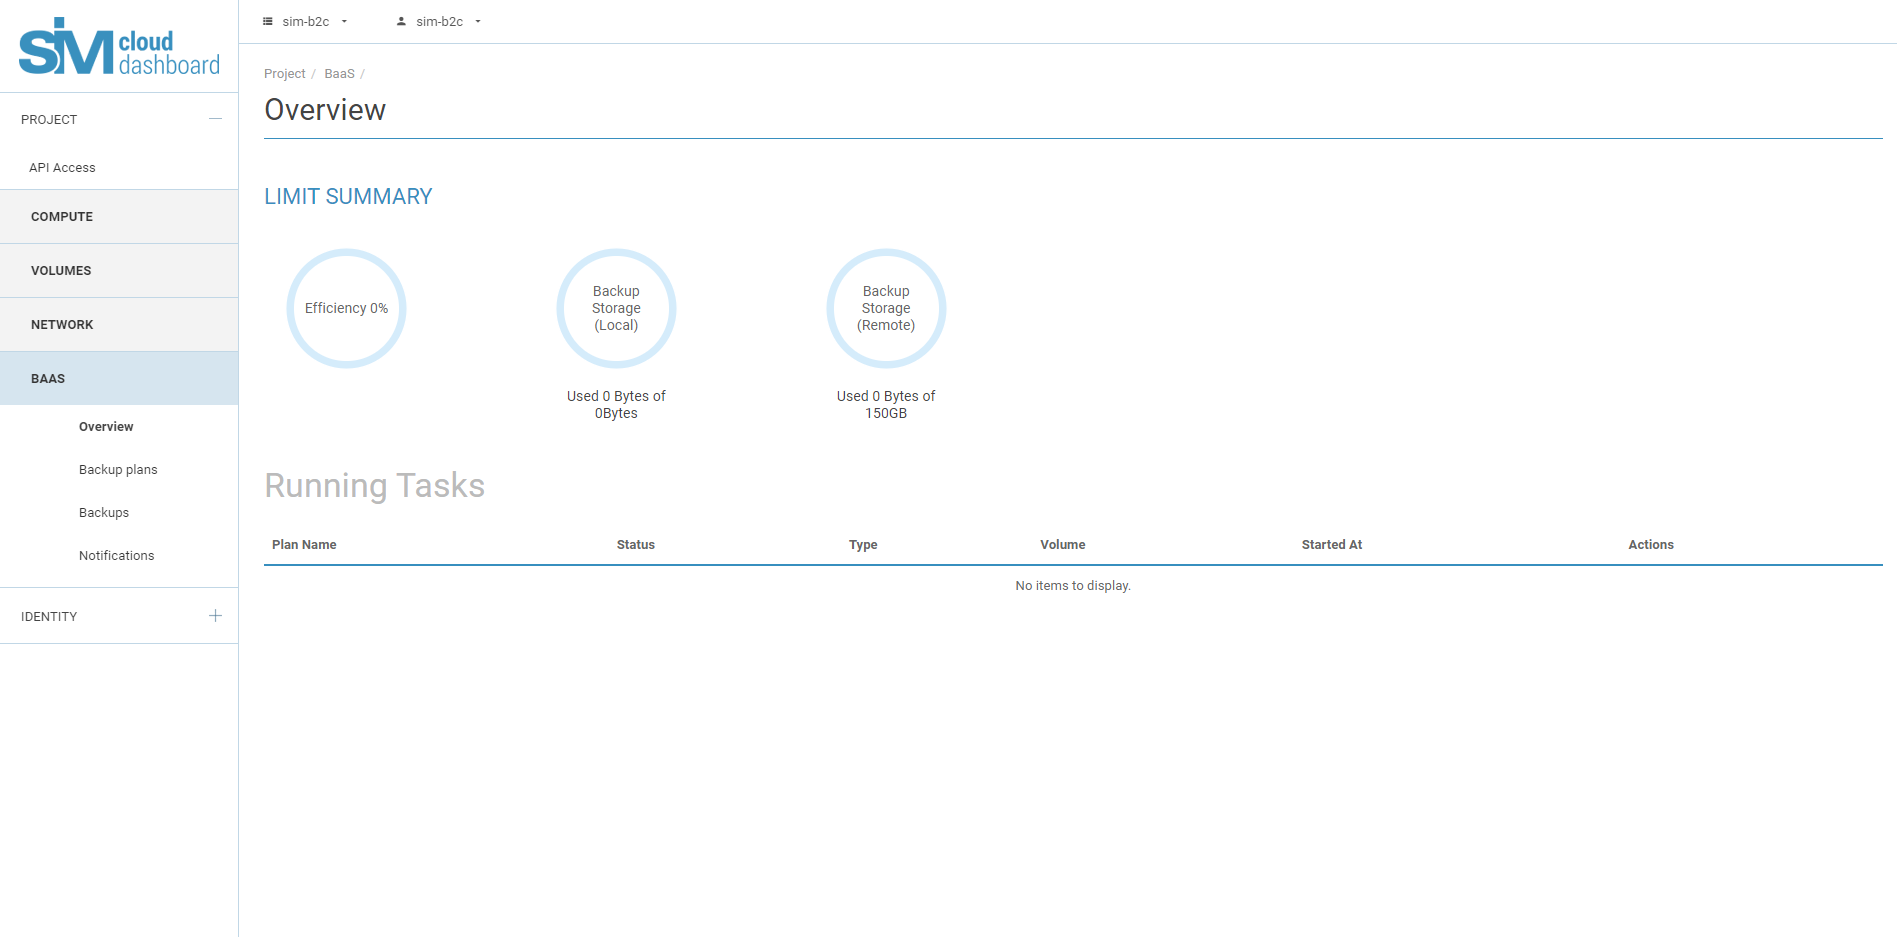
As part of the product familiarisation, this service is currently available on a trial basis to all clients of our cloud services. Clients who have not yet ordered an additional backup service can familiarise themselves with the interface, perform a basic configuration of the service and explore the service by its main sections (Overview, Backup plans, Backup copy, Notifications). In this instance clients can look through the limit summary and the list of active backup plans and create, delete and view created tasks. They will not be able to execute the tasks, however, owing to the lack of a disk quota on the BaaS backup storage. In the Overview section the client will see: ‘Used 0 GB of 0 GB’, and this limit will apply for both local and remote storage.
For clients who have already ordered SIM-Cloud BaaS, the functionality of BaaS Backup will be available in full. Once the service is activated, the client will see in the ‘Overview’ section the disk space ordered in the backup storage, the backup copies available for creation - and this will also indicate that they can begin to create backup plans for setting restore points.
Ordering the service
The SIM-Cloud BaaS cloud backup service can be ordered on the page Cloud infrastructure as a service (IaaS)):
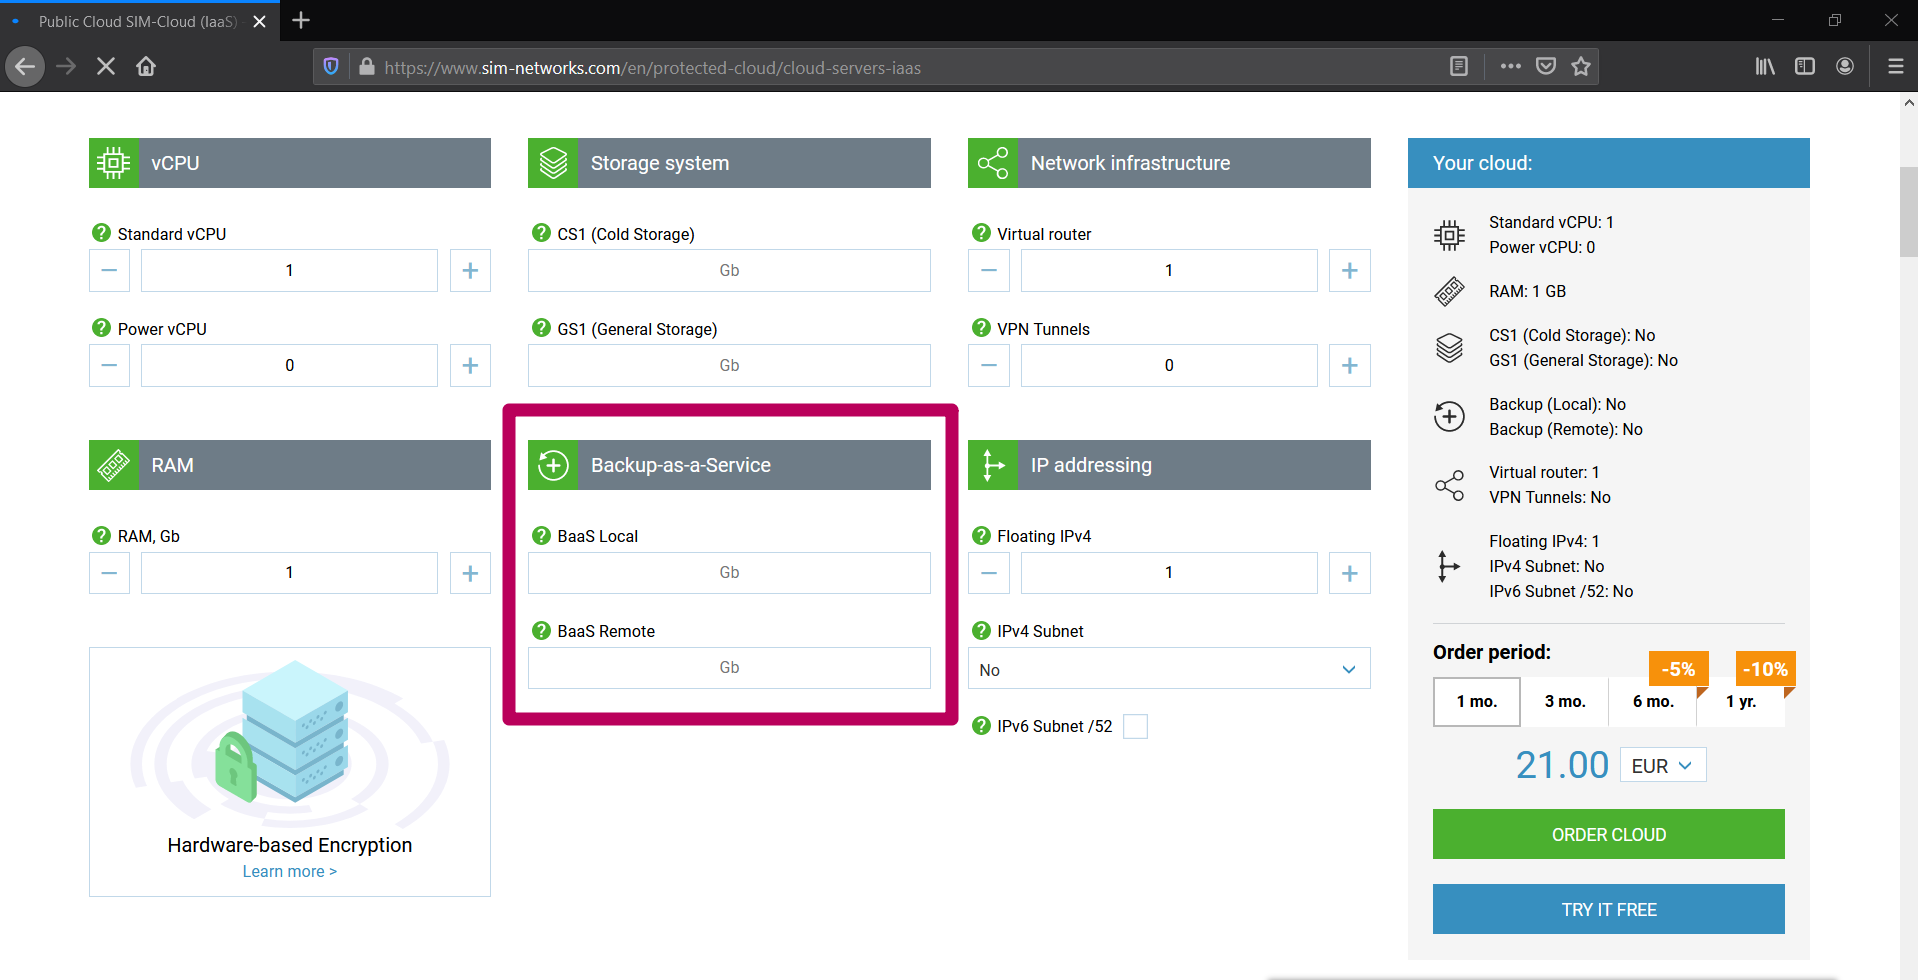
Clients already using SIM-Cloud can order the backup service manually in the billing area or by contacting Customer Care (СС) via the ticket system on our website.
Step-by-step instructions for ordering the BaaS service are available in our article.
When placing the order, the client should request the amount of backup disk space required and also state the type of storage (local or remote). If the client is unsure what volume of disk space he requires or needs further information on the types of storage, a consultation can be arranged with the specialists of Technical Support to address these questions.
How to select a storage quota
When calculating the disk quota required for backup, the following should be taken into consideration:
- The volume and number of disks to be backed up;
- The dynamics of data change on the disks;
- The number of restore points;
- The frequency at which restore points are created.
If a mistake was made or if new circumstances of use of the backup service arose during the process of calculating the required disk quota, the client can always purchase additional space or cancel excess space; both of these actions are done with the assistance of our Customer Care.
Note
When ordering a disk quota for backup storage, the quota volume should be a multiple of 10 GB.
The interface and basic actions
The web interface for SIM-Cloud BaaS - ‘Backup (BaaS)’ - consists of four main subdivisions:
Overview
The Overview section shows the limit summary and also the efficiency of use of the backup disk space allotted to the client for creating backup copies. The disk space used and the overall space are specified for both local and remote storage. For ease of visualisation, the information is presented in the form of pie charts with captions (e.g. ‘Used 91.6 GB of 300 GB’ for remote storage and ‘Used 0 bytes of 400 GB’ for local storage). The efficiency of use of the resources is shown as a percentage (e.g. ‘Efficiency 83%’).
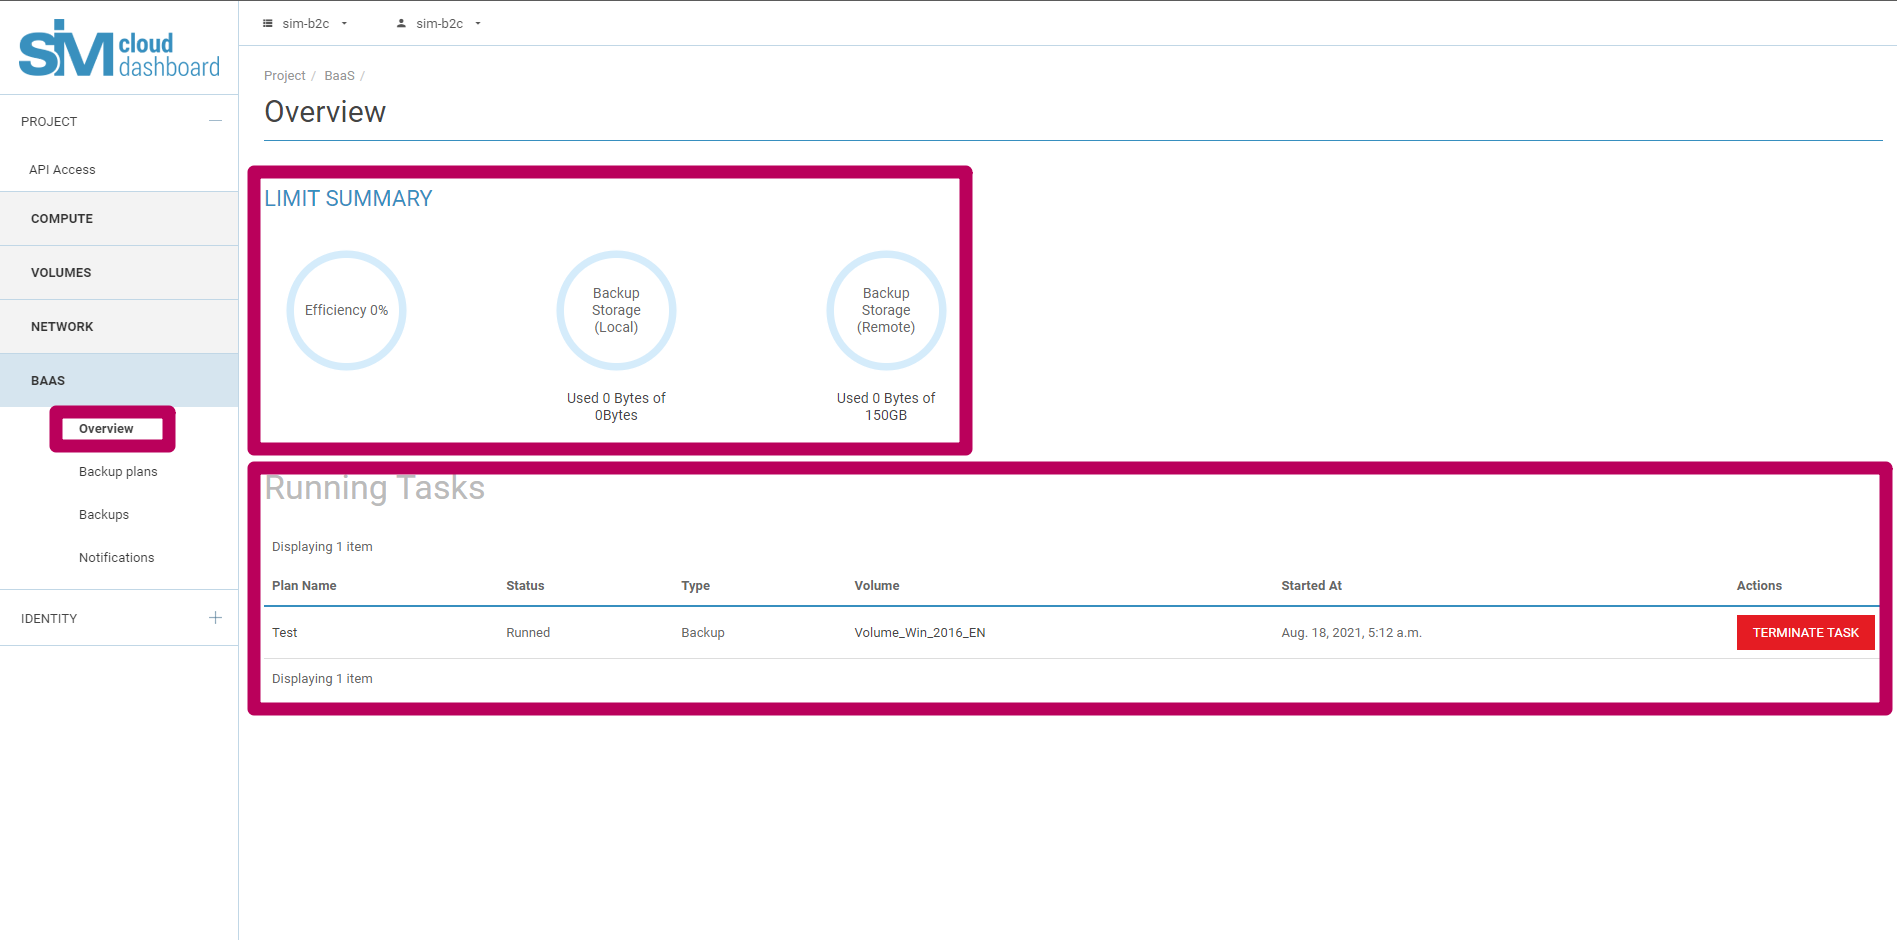
This page also displays a list of active running tasks related to backups, which is shown in the form of a table. The table contains the following information about the tasks:
- Name (specifies the name of the task);
- Status (shows the status of execution of the task);
- Type (shows the active action being performed);
- Disk (the disk in relation to which the task is being performed);
- Date of task (given in the format: ‘3 August 2020 13:27’);
- Action (an available action to stop the execution of the task).
Backup plans
The Backup plans section consists of three main blocks (tabs) with which the plans are created, managed and monitored:
- Backup plans
- Tasks running
- Task history
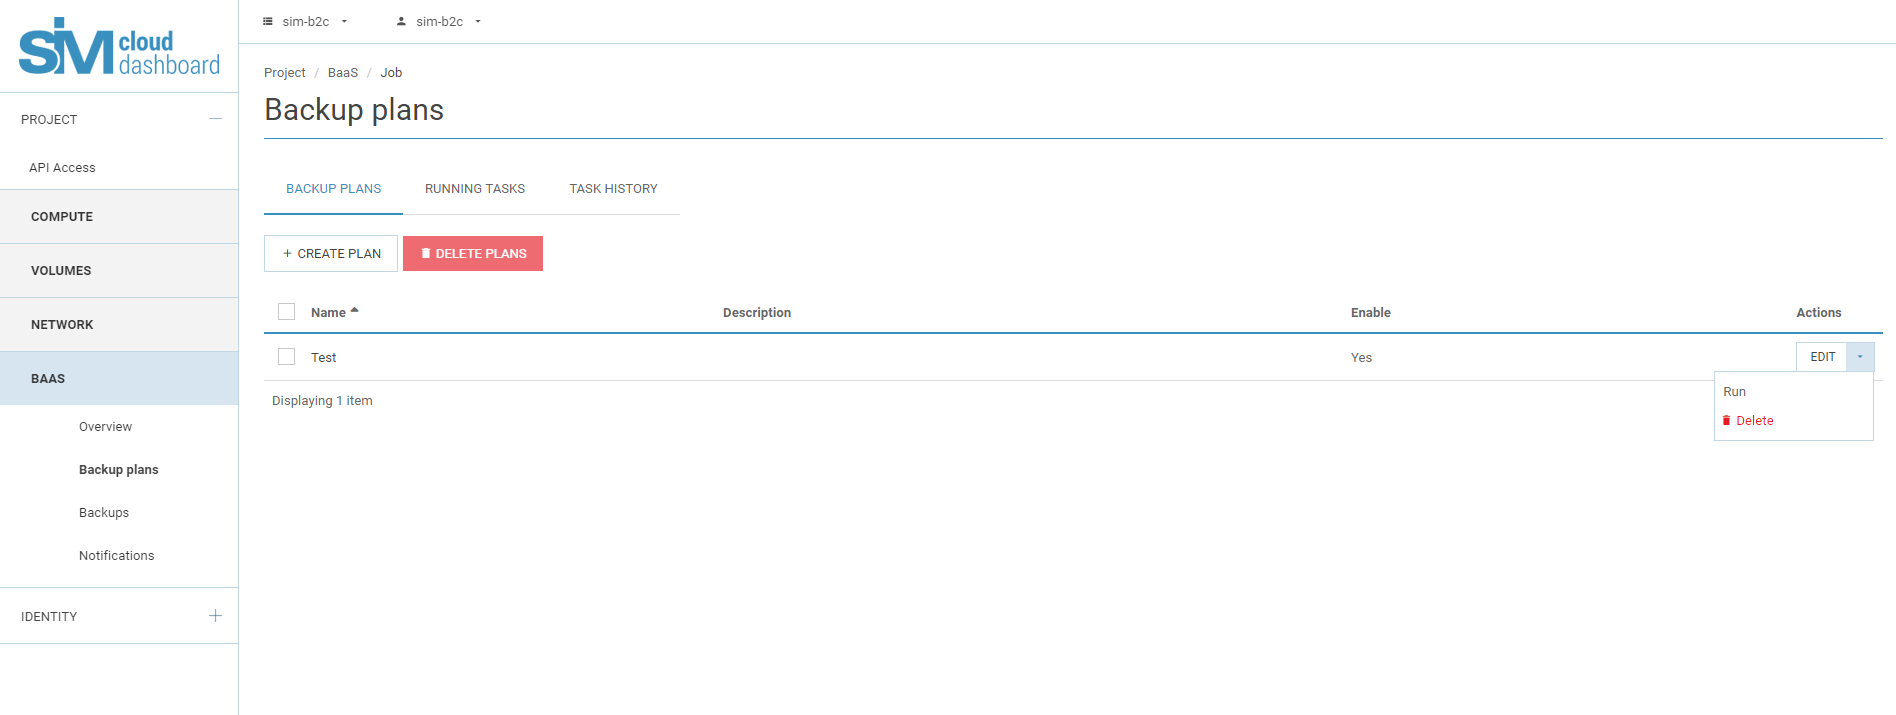
The Backup plans section is the main area of the service, where the main actions for configuring the backup are carried out. This section contains the following main operations/functions for:
- Creating
- Deleting
- Editing
- Viewing.
Creating a backup plan involves only a few simple actions:
- Specify a name for the task;
- Select the disk to be backed up;
- Specify the number of restore points (default setting is 10);
- Specify the frequency of backup: daily or weekly (default setting is daily);
- Specify the time of day or day of the week (default is 00:00);
- Select backup storage: remote or local (default is remote).
Each of these stages is discussed in more detail below.
Creating
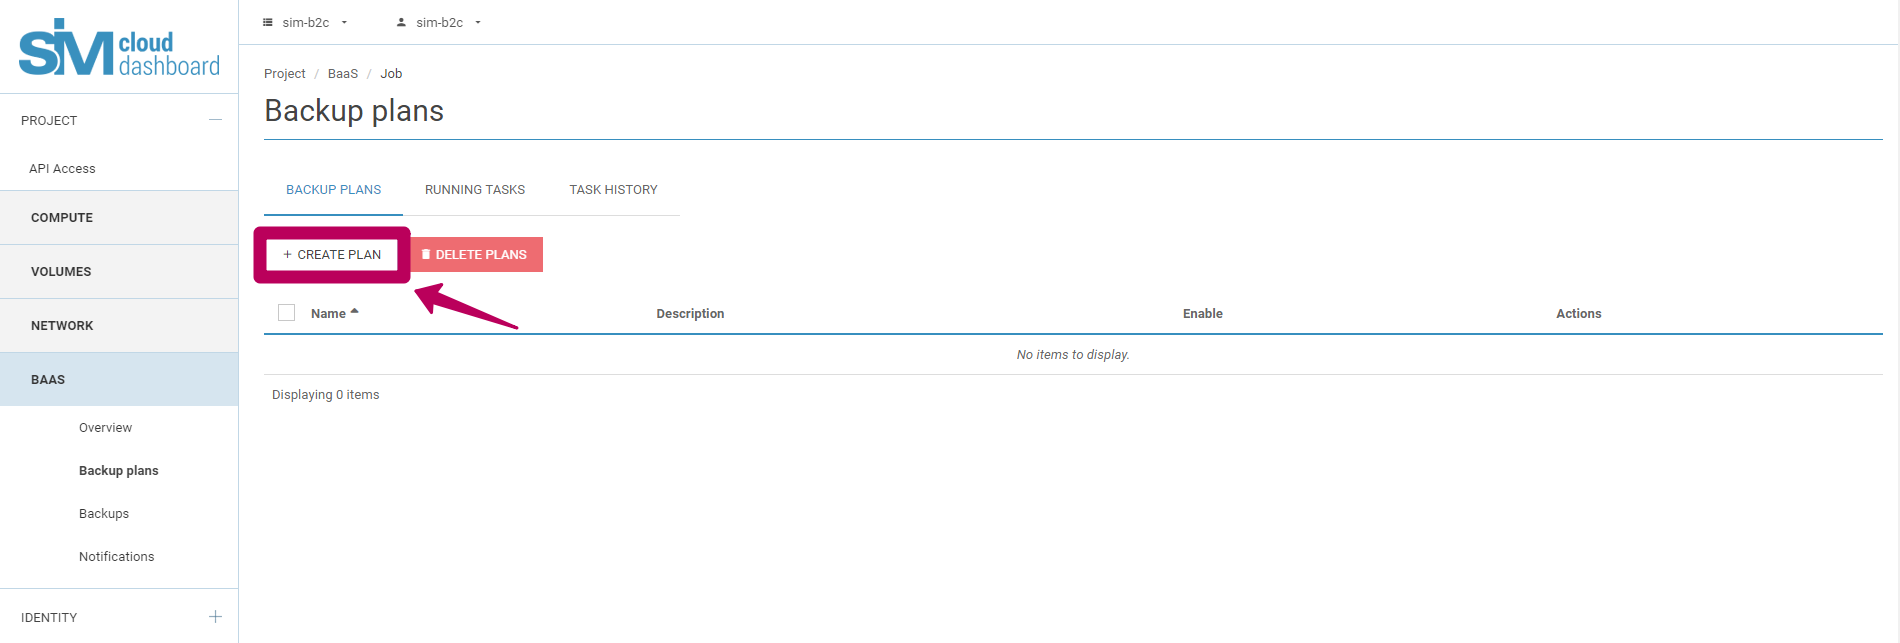
To create a backup plan, click Create plan, which starts a wizard in which the parameters and attributes of the new plan can be entered straight away:
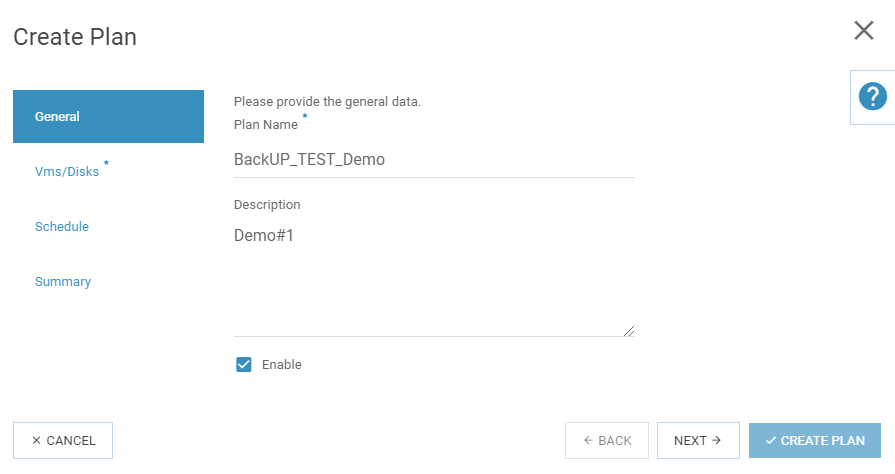
In the first section, General, the basic data of the task are specified: the Name of the backup plan and its Description. All entry fields accessible to the client support utf-8 coding. In this window, enter a name for the plan. The ‘Description’ field is optional. Also specified in this window is the activity status of the current plan (enabled or disabled):
After entering this basic information about the task, go to the next required stage of the configuration: Vms/Disks. To move to this section, press the Next button or click on its title. In this section you must select at least one disk from the list of disks available. The service creates the list of available disks on the basis of the statuses in the Disks section that can have been set to be backed up. Disks that must not be handled by this process are not displayed.
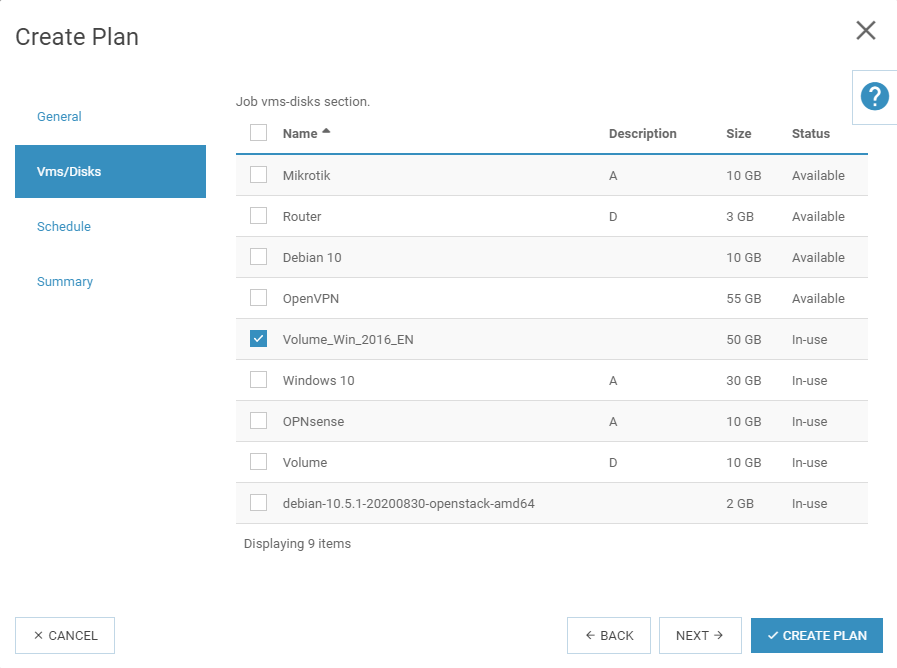
After choosing the disk for which the backup process will be executed, you can terminate the configuration of the task (in which case the default values will be applied for the settings described above) or go on to configure the scheduling of the process.
Configuring the schedule for running the task takes place in the ‘Scheduler’ section, which you can access by pressing ‘Next’ or by clicking on the section name:
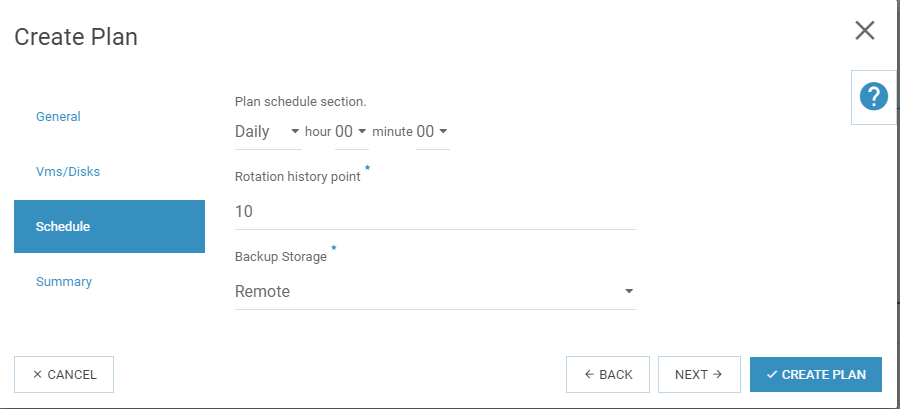
In this section the frequency of execution of backups can be specified (daily or weekly), together with the time of day at which they are launched (00:00 – 23:59). In the same window you can also define the number of restore points (minimum value 1, maximum value 30). Once the specified number of restore points is reached, backups will continue to be made, with the oldest replaced by the newest.
In the ‘Scheduler’ menu you can also specify the backup storage that will be used to store backup restore points. To choose the location of the storage, select ‘Local’ or ‘Remote’.
Once all required entries have been made, you can view a summary of the settings for your backup plan in the ‘Summary’ menu. This window displays the entries that were made in the previous steps:
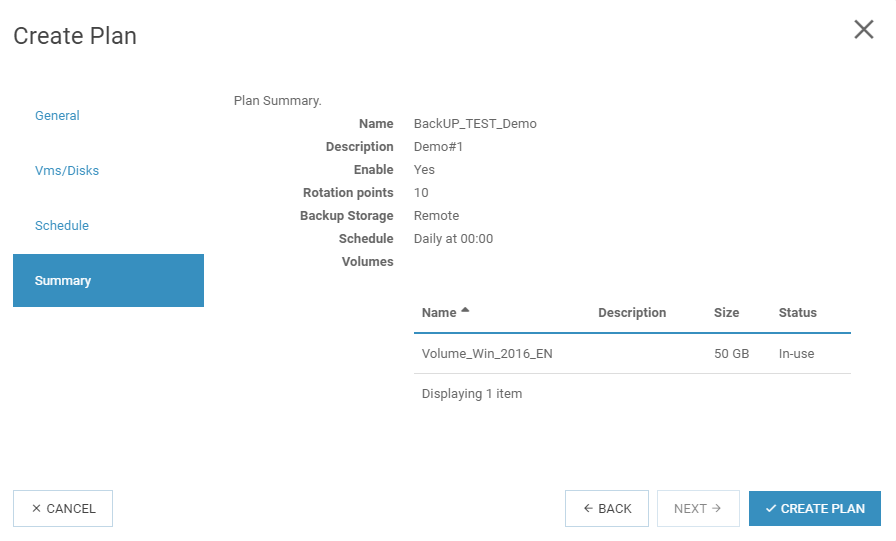
To save and apply the settings, click the ‘Create plan’ button. If all the attributes were correctly defined when creating the task, the task will be added to the list for execution in accordance with the criteria selected for producing backups (name, description, activity).
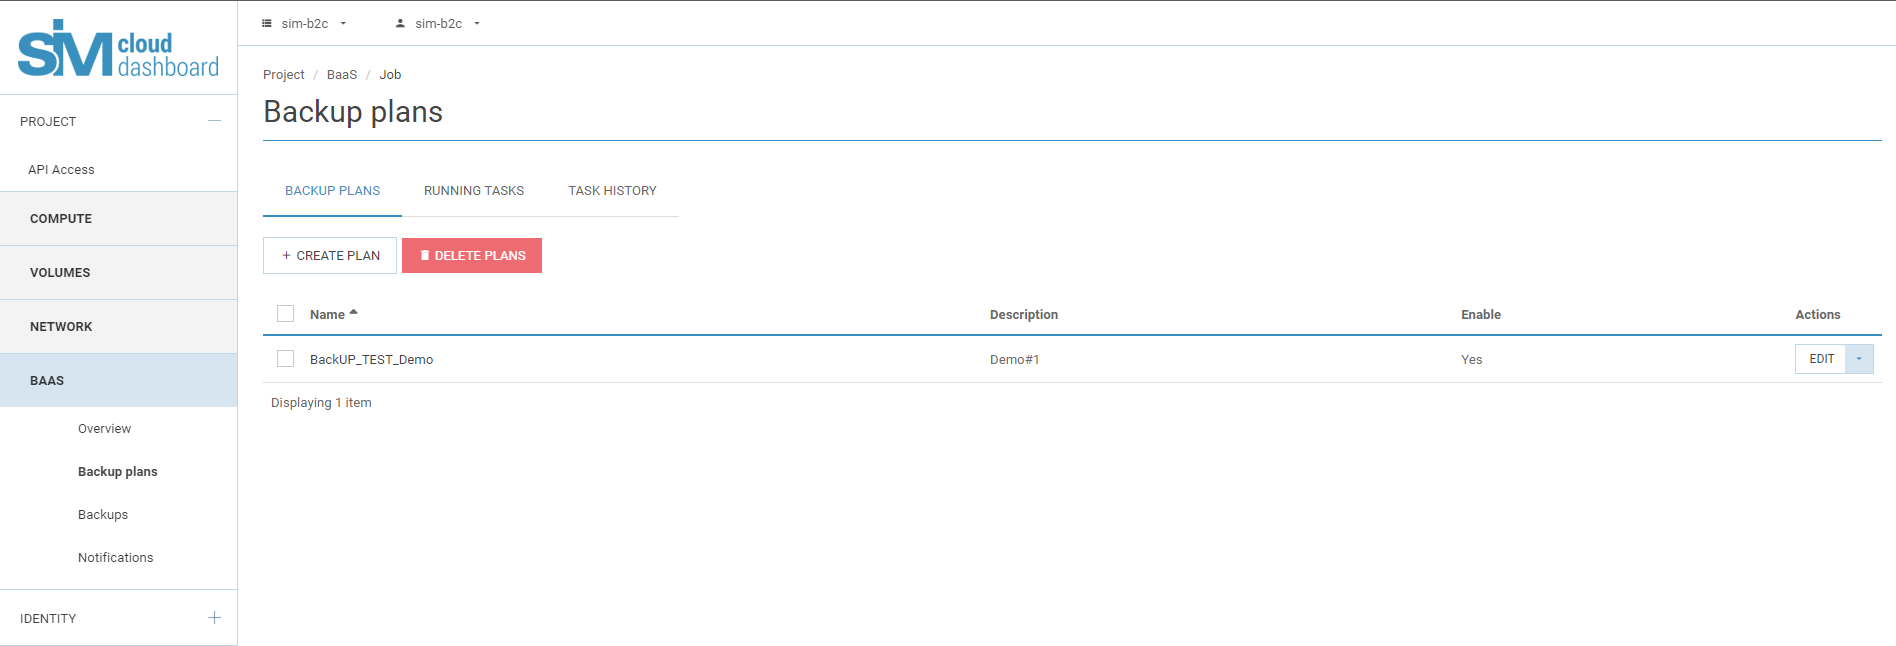
Once the backup plan has been successfully created, the user can access the ‘Backup plans’ section to:
- create further backup plans;
- delete the backup plan;
- edit the backup plan;
- launch the task manually.
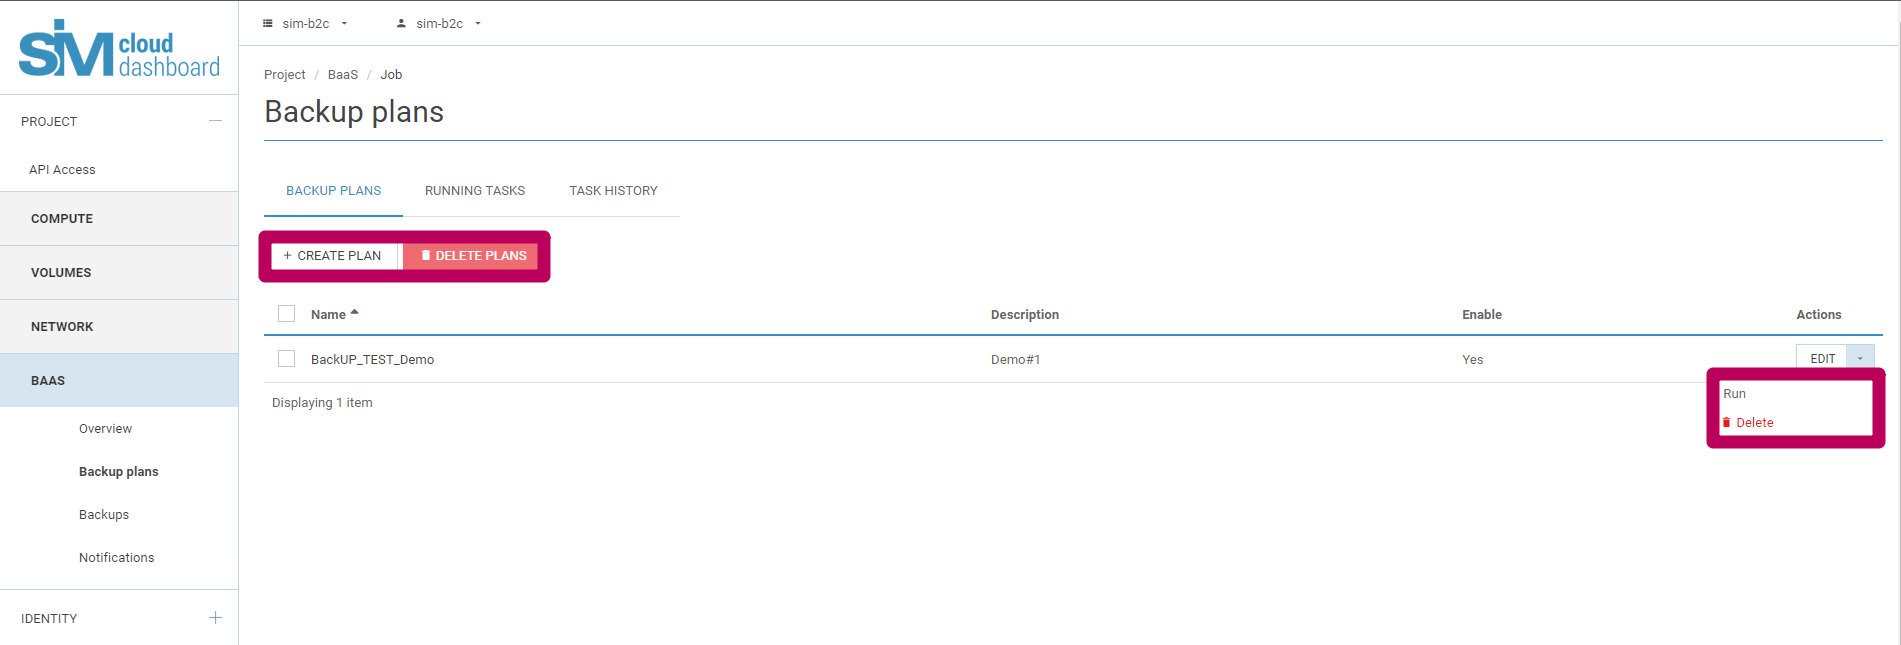
Below these actions with the tasks are examined in more detail.
Deleting
The user can delete all tasks together or individually. To delete a task, select it from the list (tick its checkbox) and click the button Delete plans.
The system generates a prompt for you to confirm the action, which also lists the names of the tasks that will be deleted. To confirm the deletion, press the Delete plans button again. Be aware of the warning given in this window: You have selected ‘cs_test’, ‘TEST#2’, ‘TEST#1’. Please confirm your selection. Tasks that are deleted cannot be recovered:
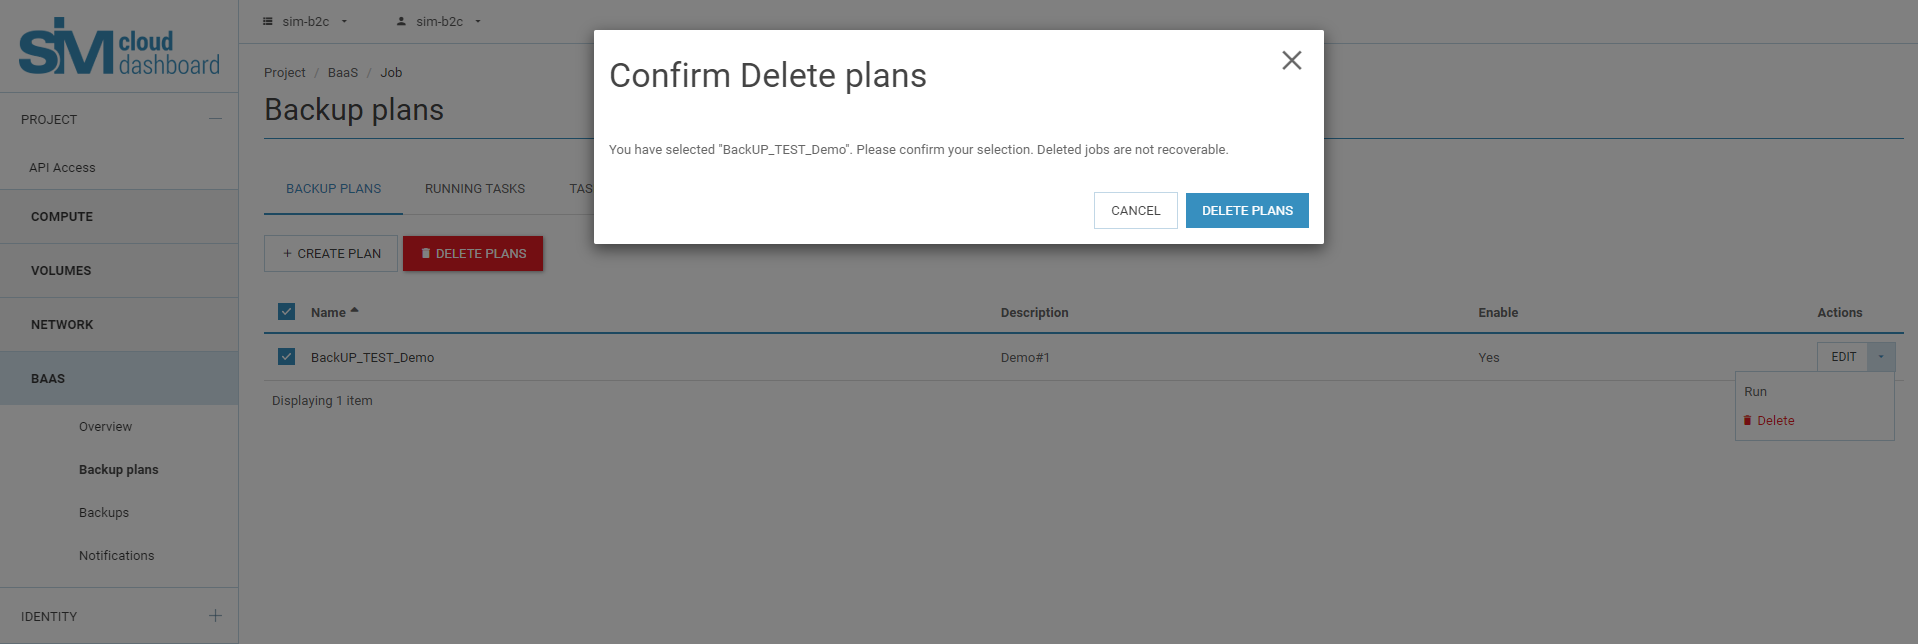
If the backup plans are successfully deleted, the service generates an appropriate notification:

The deletion function is also accessible from the drop-down list in the Actions item. To select the required action, from within the line of backup plans go to the appropriate menu and choose ‘Delete’. After invoking the delete function you must go through the confirmation procedure described above to confirm the deletion.
Editing
The process of editing a backup plan has been partially discussed above, but the basic details are examined here.
The editing function enables the client to redefine attributes of a previously created backup plan (its name, description, state, partition/disk, launch time, number of restore points).
Note
For a backup plan previously created, all parameters can be edited with the exception of the reserve storage selected. To change the reserve storage it is necessary to delete the current plan and its backups and then create a new backup plan with the required storage.
To edit a backup plan, select Edit in the backup plan line. Once all necessary changes have been entered, press the Update plan button. When editing is successfully completed, the service generates an appropriate message:

Execute
All created backup plans are executed by default at the times specified in their scheduler (specified while creating or editing the task). The parameters for launching the task can be edited with the Edit function.
Note
The backup plan is automatically launched and executed if the plan is active: (i.e. the ‘Enabled’ field contains the value ‘Yes’); if however this field contains the value ‘No’, that task will not be executed automatically. Additionally, tasks with the ‘Enabled’ field set to ‘No’ cannot be executed manually. The time at which the task is launched automatically is defined in the User dashboard settings. The time is defined in relation to the settings of the user’s web browser.
All backup plans with the setting Yes in the Enabled column can be run in advance by hand. To launch a task in the manual regime, select Execute from the drop-down list of the required backup plan. After you press the Execute button, the service generates a confirmation prompt for the selected action that displays a list of the names of the plans to be run. To confirm, press the Execute task button:
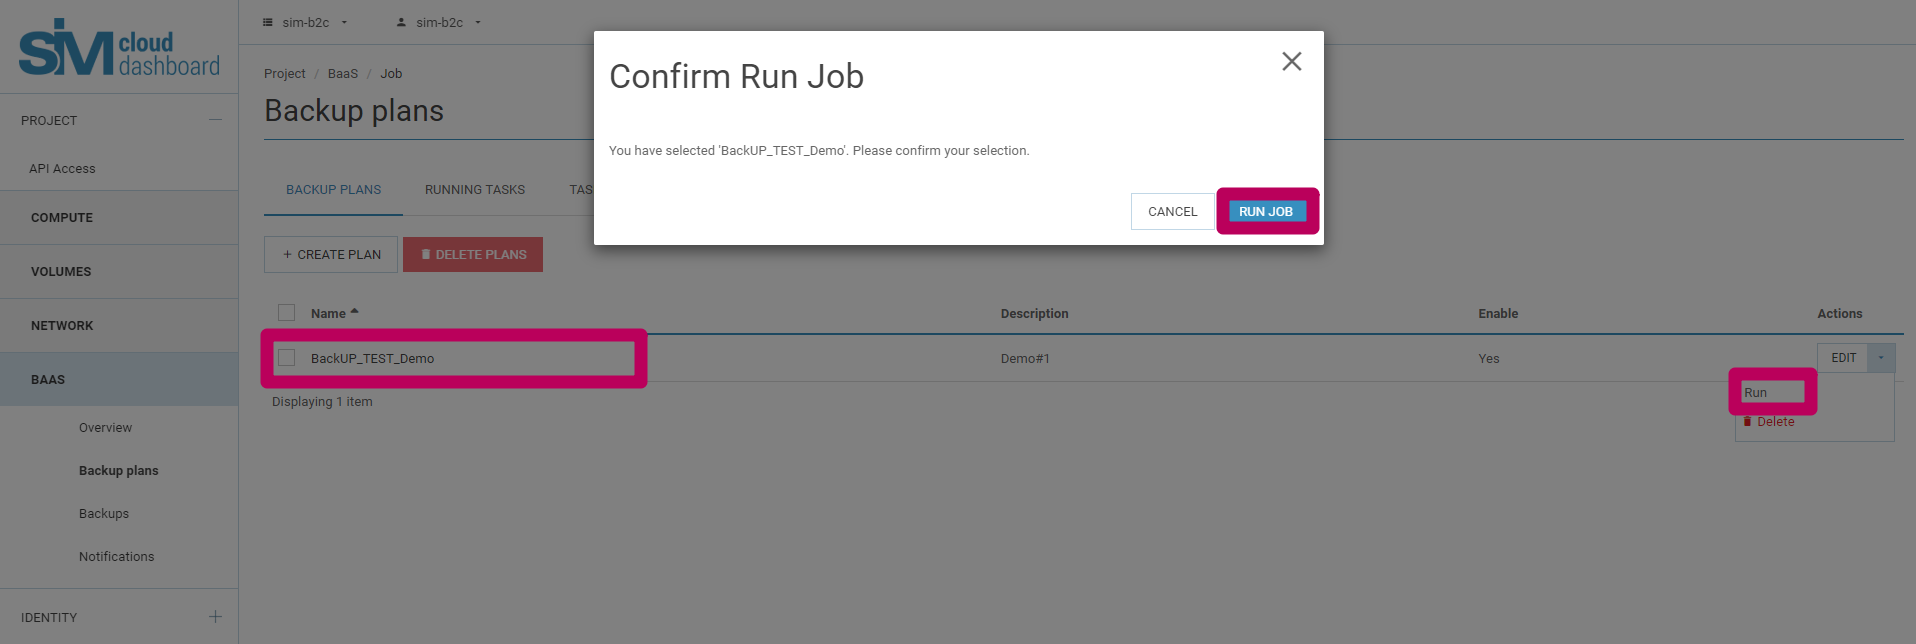
Once the backup plan has been launched, the system generates an appropriate notification:

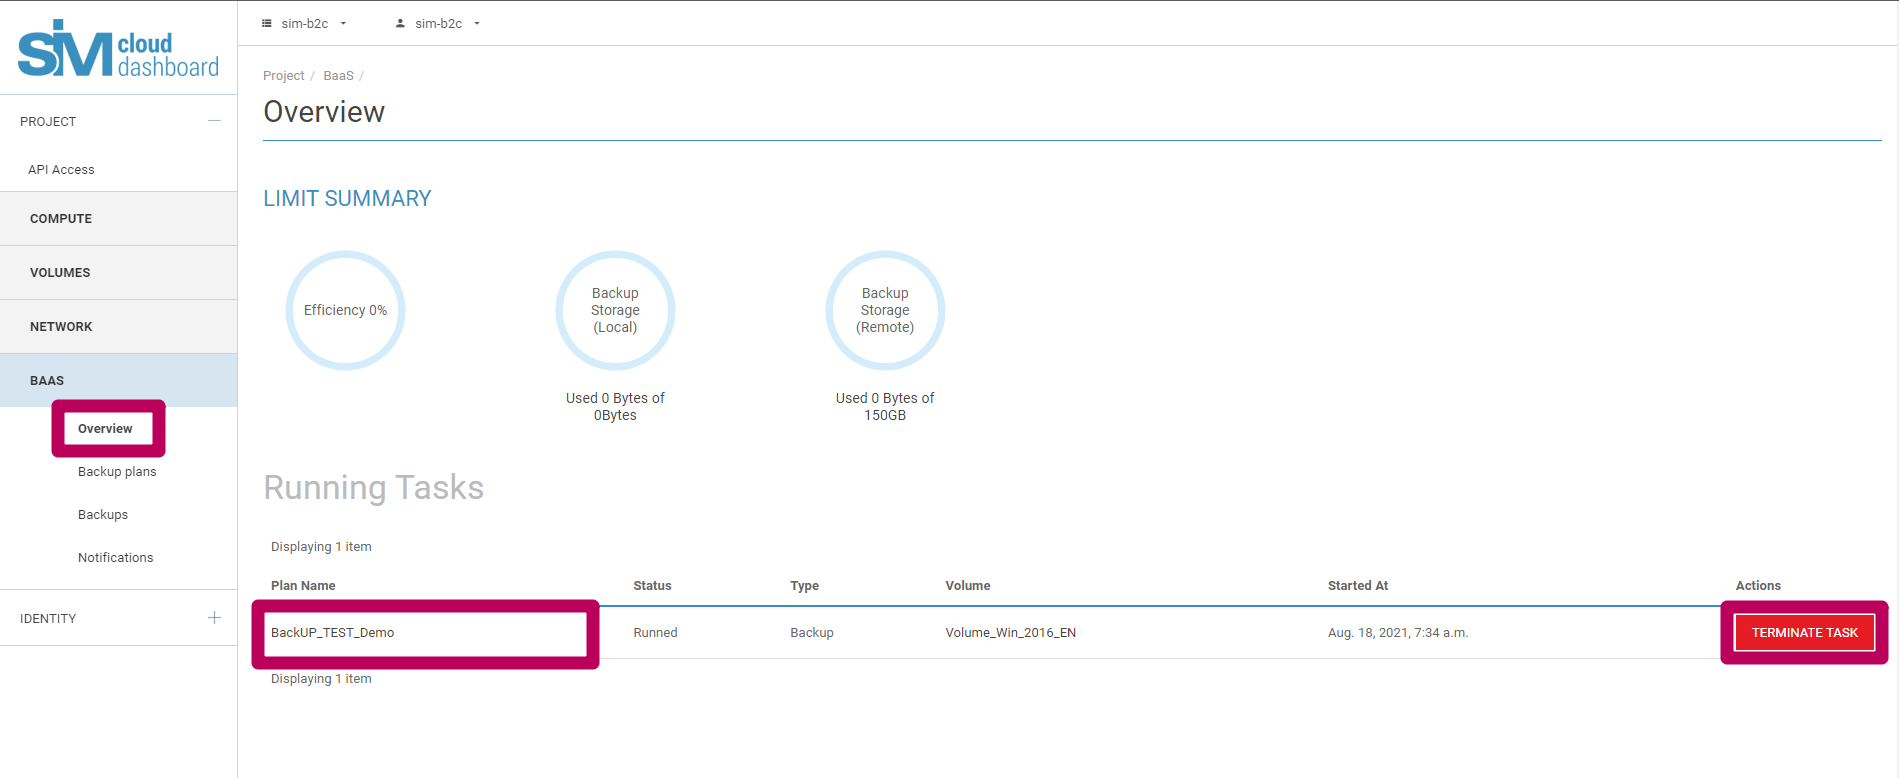
You can search for or view any backup plans that are running from two places on the graphical interface:
- Tasks running (Backup plans section);
- Tasks running (Overview section).
The two places for viewing the tasks running contain the same information about the tasks: name, status, type, disk, time executed/launched.
Should it be necessary, the user can stop the execution of the task. To this, in the Actions column, press the Stop button:
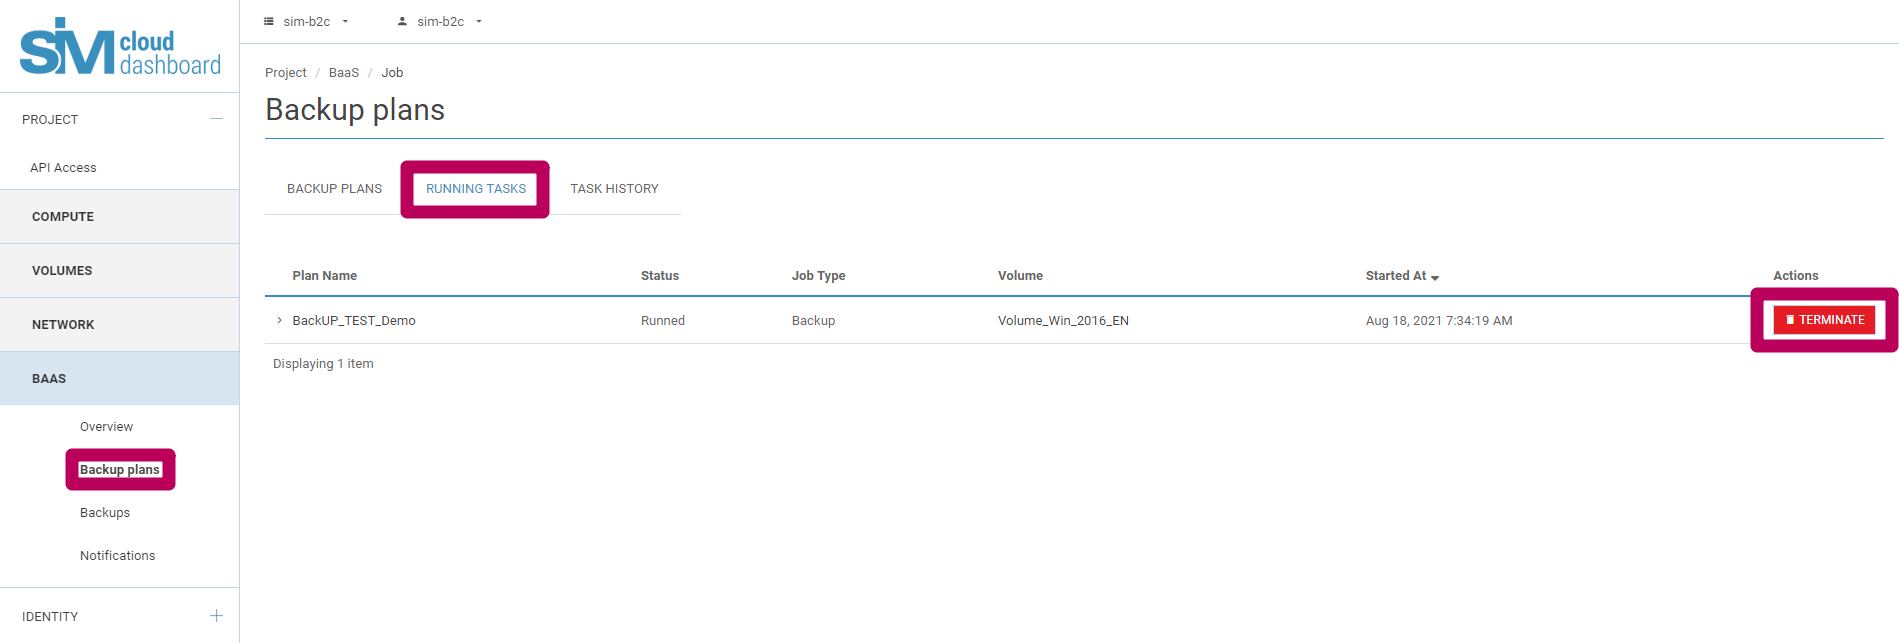
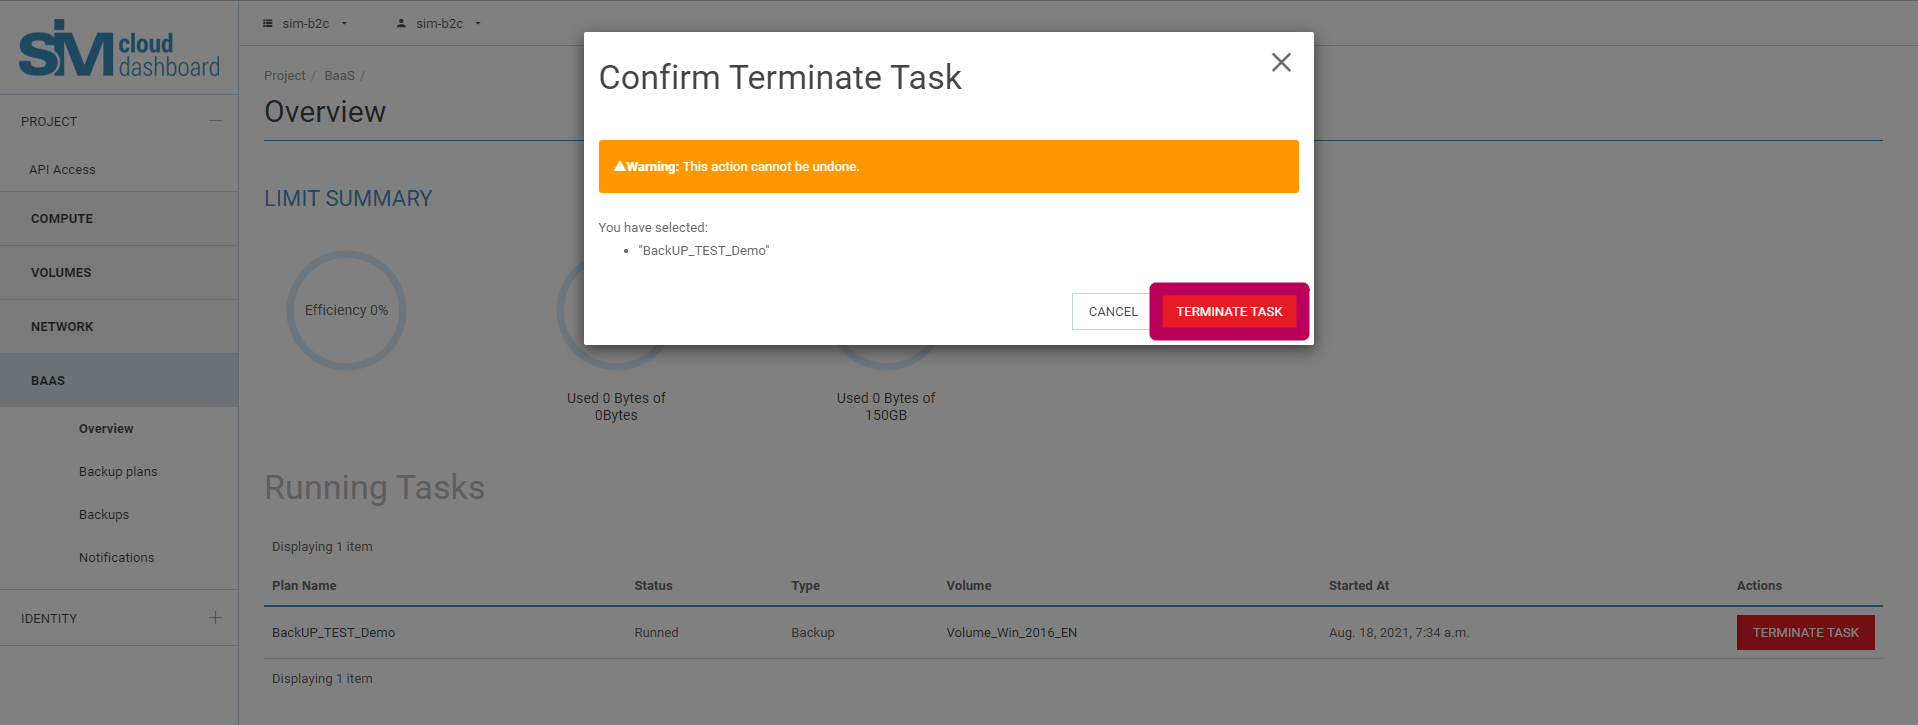
After you press the Stop button, the service generates a confirmation prompt for the selected action that displays a list of the names of the plans to be stopped. To confirm, press the Stop button again:
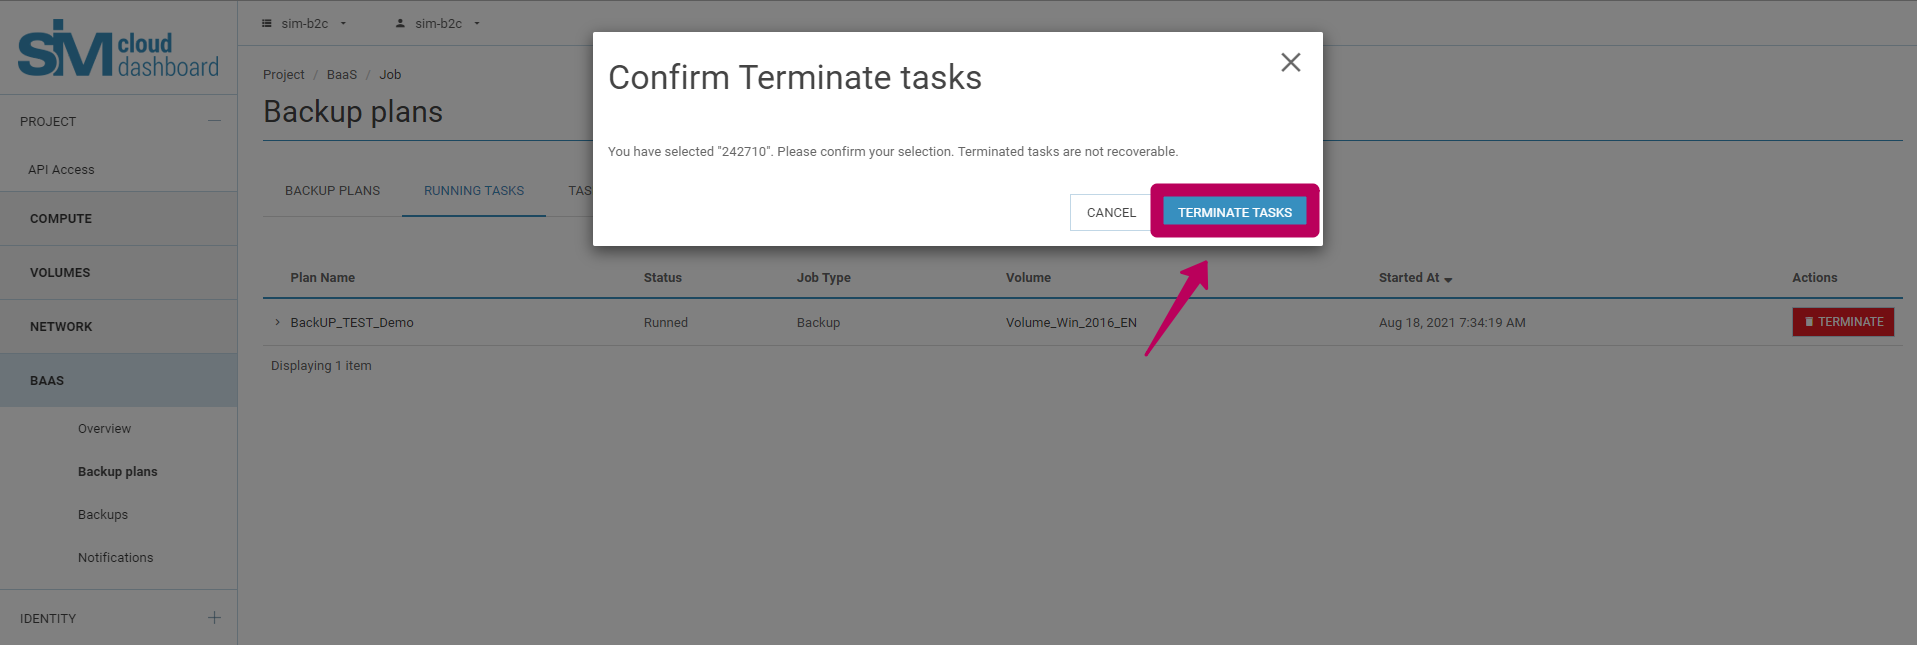
If stopping the backup plan from the Tasks running (Backup plans section), proceed analogously:
Once the operation of stopping the task has been successfully completed, the service generates an appropriate notification:

Note
Stopping a backup plan will be successful if the plan involves more than one disk or if some of the tasks of other backup plans are in the queue for execution. In this case the active tasks will be executed to completion, but those that were in the queue at the moment of the stop command are stopped.
Tasks running
This section is designed to show the tasks associated with backup and recovery that are currently active and running. When viewing the tasks running, the following main task attributes are displayed:
- Name
- Status
- Type
- Disk
- Started at
- Actions
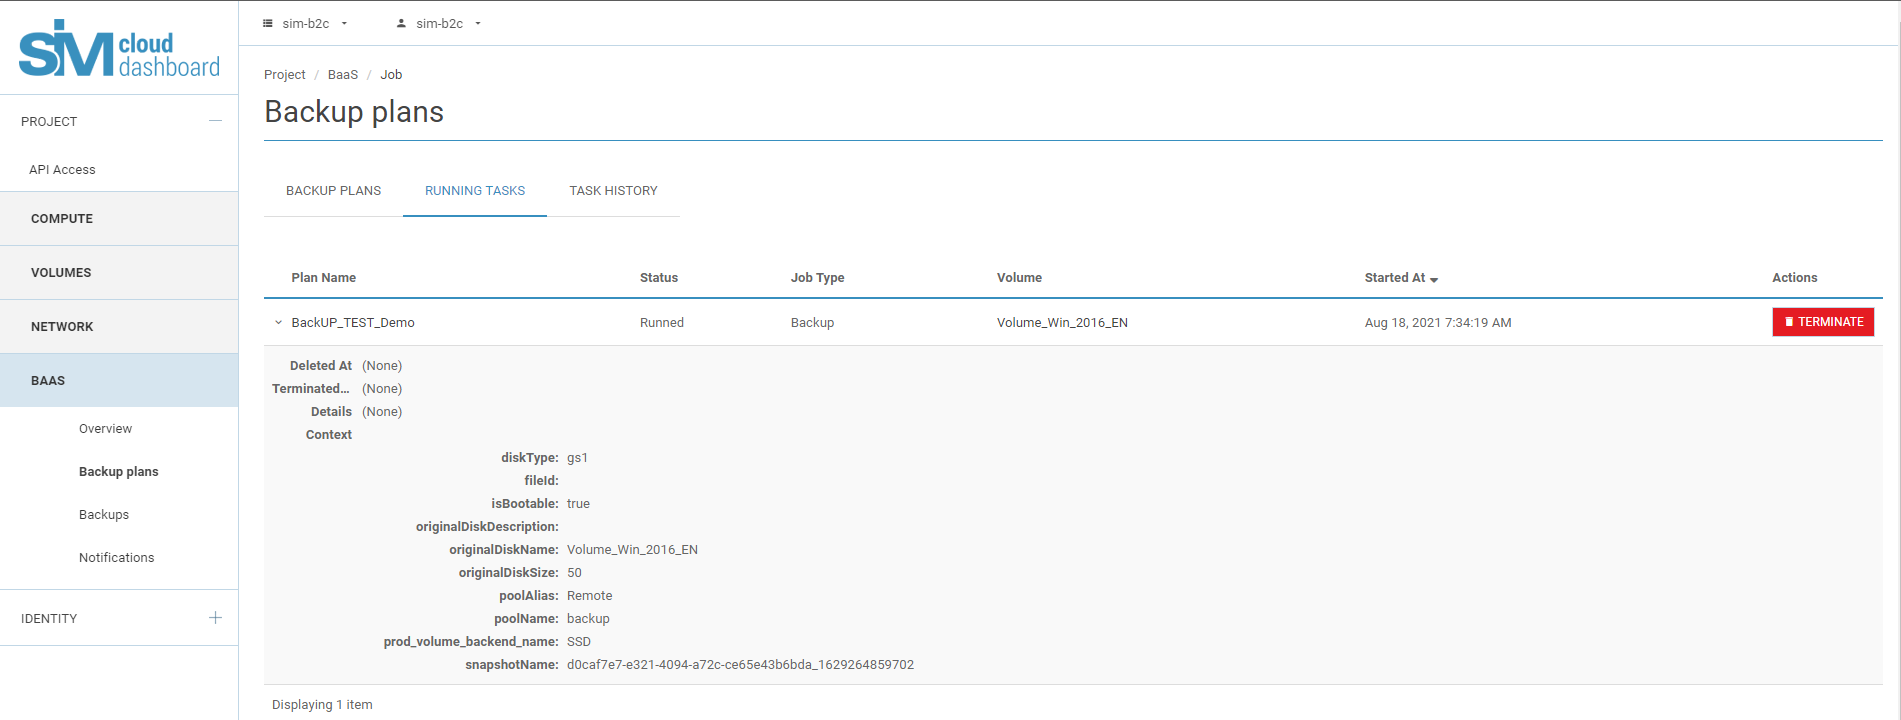
The user can abort any of the tasks currently running by clicking the Stop button situated on the same line as the task to be stopped. It should be pointed out that this process cannot be reversed, i.e. the execution of the task cannot be restored or continued once it has been aborted.
Task history
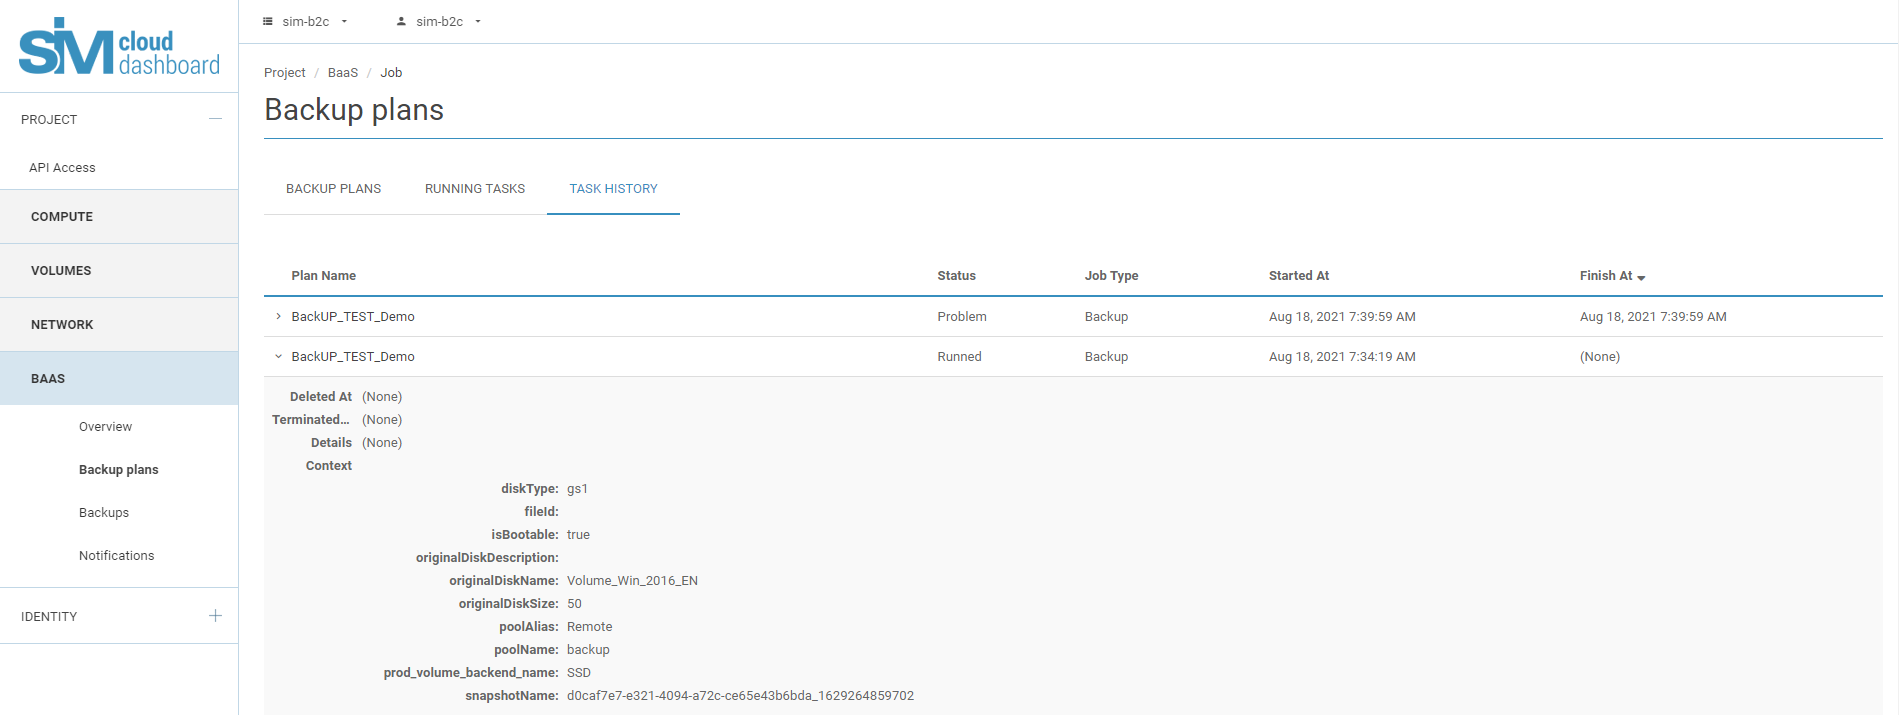
This section serves to provide information and forms a log of completed tasks related to backup and recovery. When viewing the task history, the following main task attributes are displayed:
- Name
- Status
- Type
- Started at
- Completed
The task history displays the tasks that have been successfully completed, interrupted tasks and also those that were completed unsuccessfully (with errors). The user can also view more detailed information about particular tasks. Tasks with the status ‘Completed’ contain the following attributes and approximate values:
Deleted at         (None)
Stopped at         (None)
Details            (None)

Context:
diskType: gs1
fileId:
isBootable: true
originalDiskDescription:
originalDiskName: GNU Linux Debian 9.3 [EN]-2
originalDiskSize: 5
poolAlias: Local
poolName: backup-local
prod_volume_backend_name: SSD
snapshotName: 49821fec-c550-4293-9cb5-4789b714e201_1596463881003
Aborted tasks are given the attribute Aborted, the values of which specify the date and time at which the task was stopped (e.g. 2020-08-03T14:17:16.000Z).
Backups
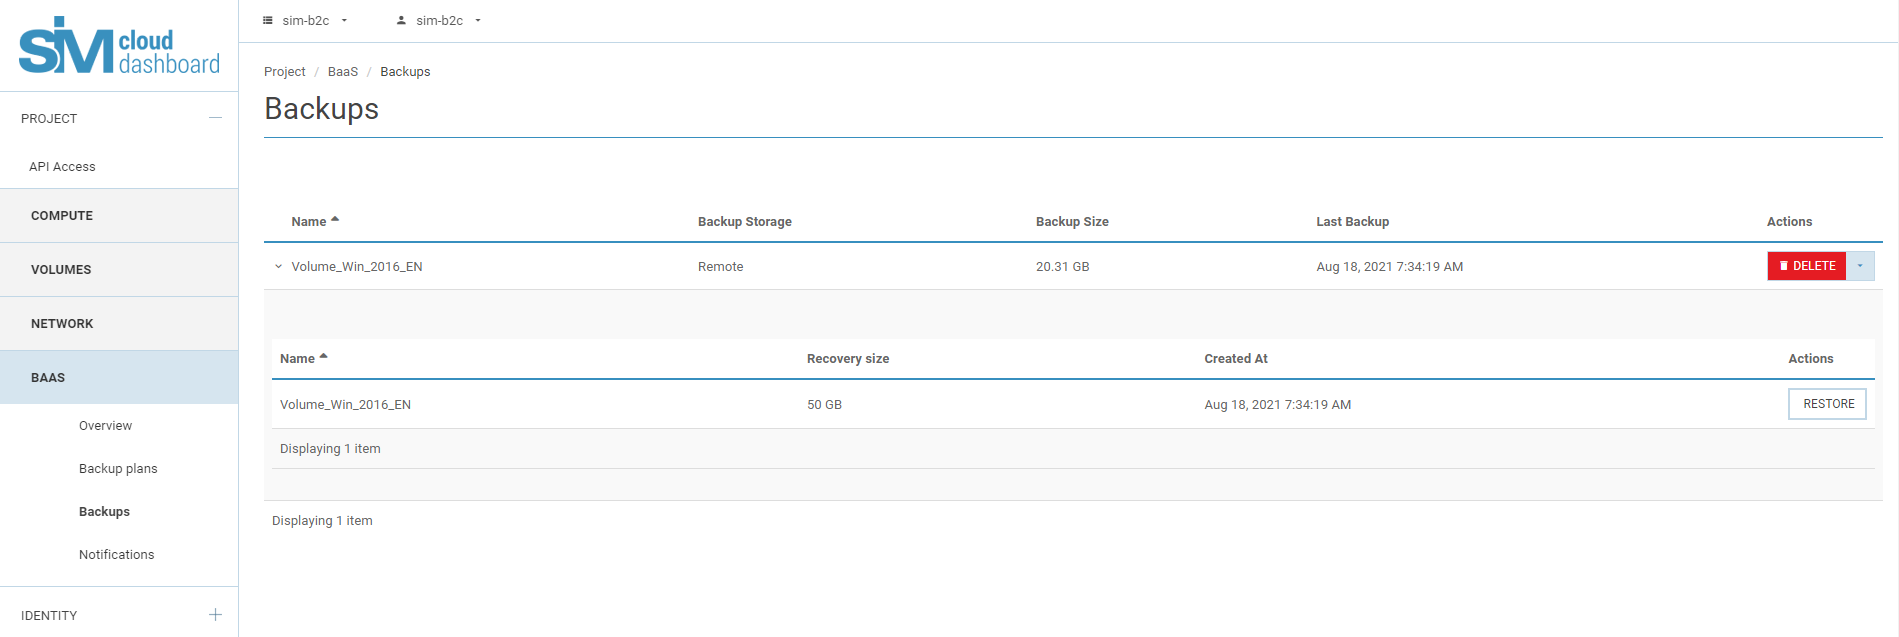
The Backups section is designed for performing recovery operations. Note that only the disk and the data stored on that disk at the moment that the backup was created are restored and not the instance itself. This means that after successfully completing the recovery procedure in the Disks section, a new disk will appear that, depending on the objectives set for it, will need to be linked to the existing instance, or a new instance will have to be created on the basis of it:
Recovery
To restore a disk from its backup, it is necessary to:
- Select the disk by its name from the Name column.
- Define the required restore point for the disk by the date of creation from
- the Created column.
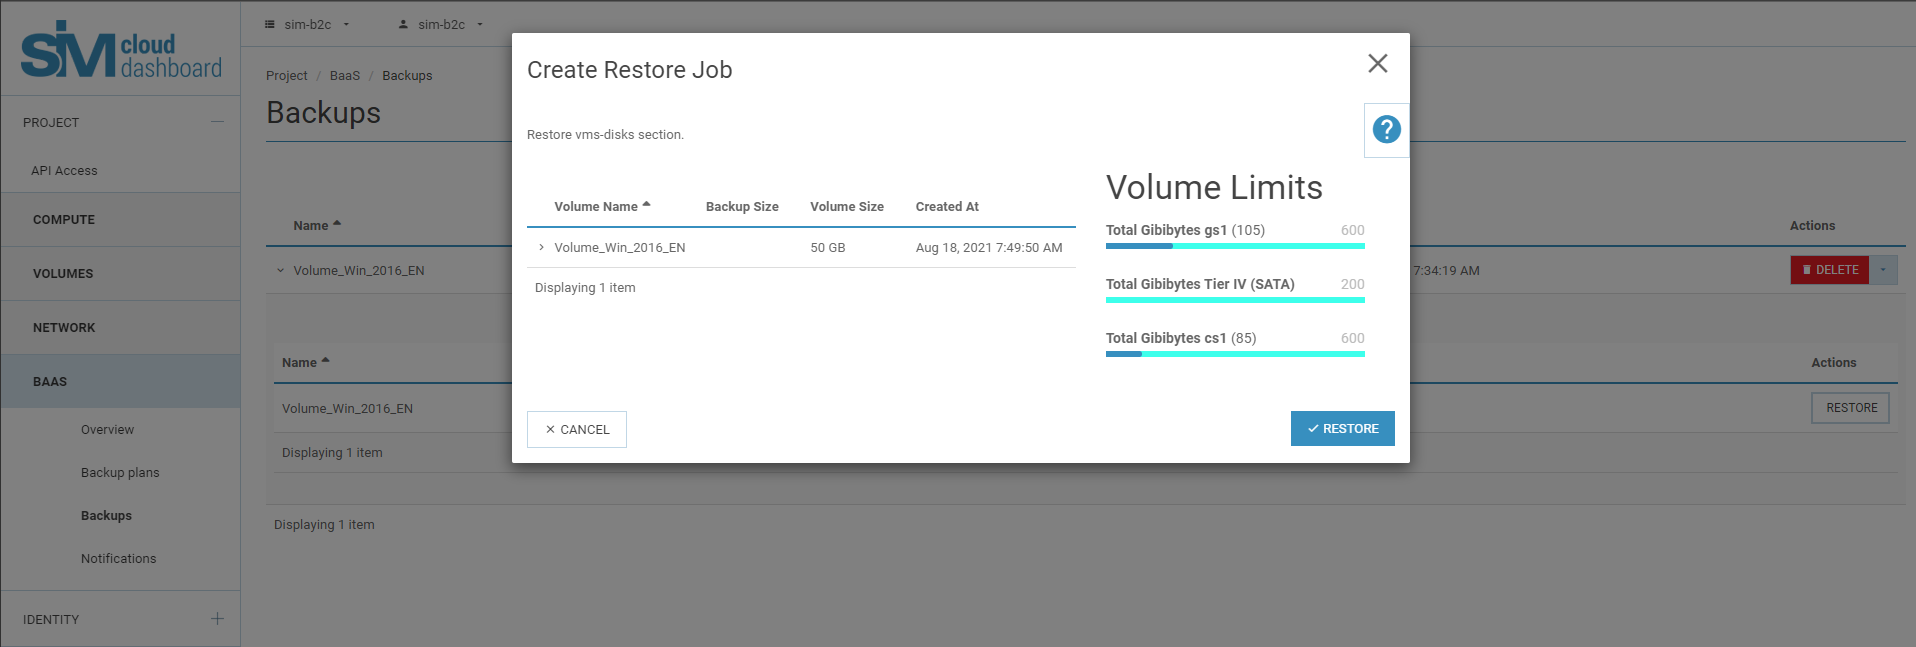
- Start the disk recovery process by pressing Restore, after which a new dialog opens in which you can check or redefine the attributes of the disk to be recovered and also to verify that there is sufficient disk space available for the project (disk limit) and the destination to which the disk will ultimately be restored.
When a backup copy of the disk is made, not only the disk itself is saved but also other disk attributes: the type of disk (cs1 or gs1), its name, description and whether it is a boot disk or not. When restoring the disk from the backup, it is restored with the same attributes/options (according to the previously stored context).
At the disk restore stage, the functionality of the service lets you redefine the following disk parameters:
- Name
- Description
- Bootable
- Disk type for recovery (cs1 or gs1).
Warning
Before launching the recovery process, ensure that there is sufficient disk space in the primary storage of the project to which the disk will be restored, taking into account the whole volume of the disk. If there is not sufficient disk space available, the recovery will fail.
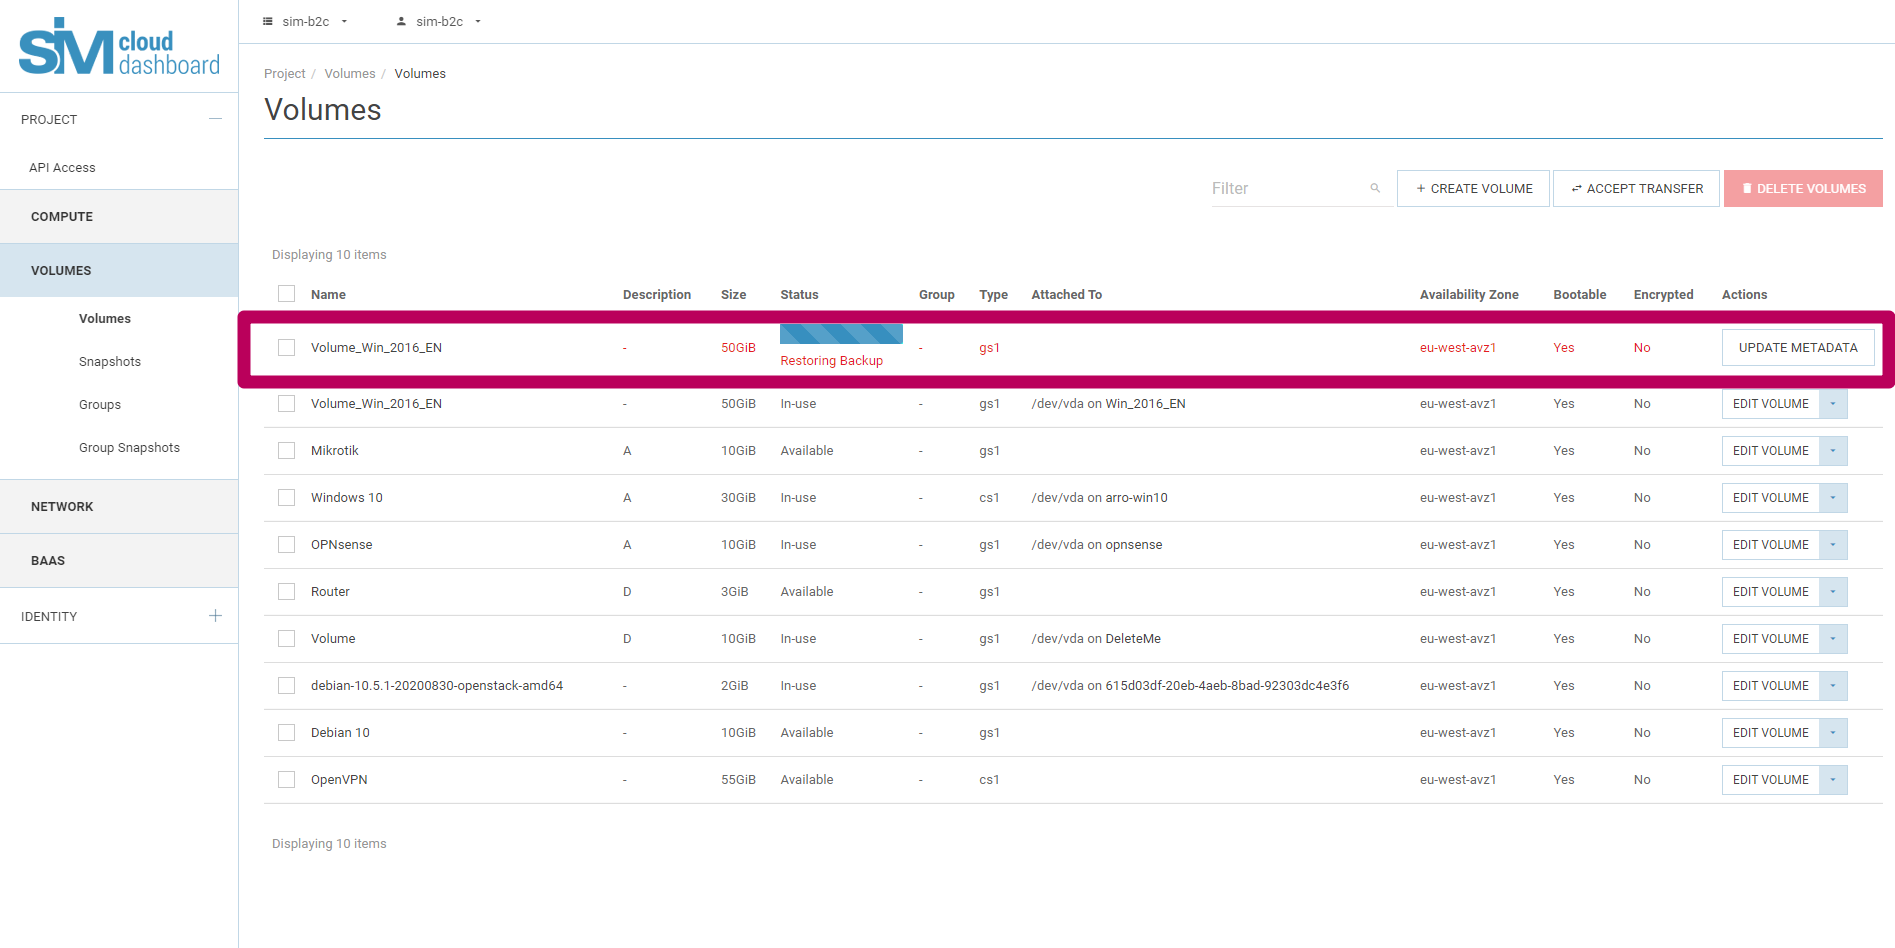
- After defining all disk parameters, confirm the start of the process by clicking the Restore button. The active task now running now appears in the Tasks and Overview sections. Once the restore process is successfully completed, the Disks (Computing capacity section) menu displays a new disk with the attributes just defined for it:
- During the restore process, the status of the disk changes to ‘Restoring from backup’:
You can also delete backup copies or disconnect a disk in the Backups section.
Deleting a backup copy of a disk
To remove all backup copies of a disk, select the relevant line in the list containing the disk name and press the Delete button:
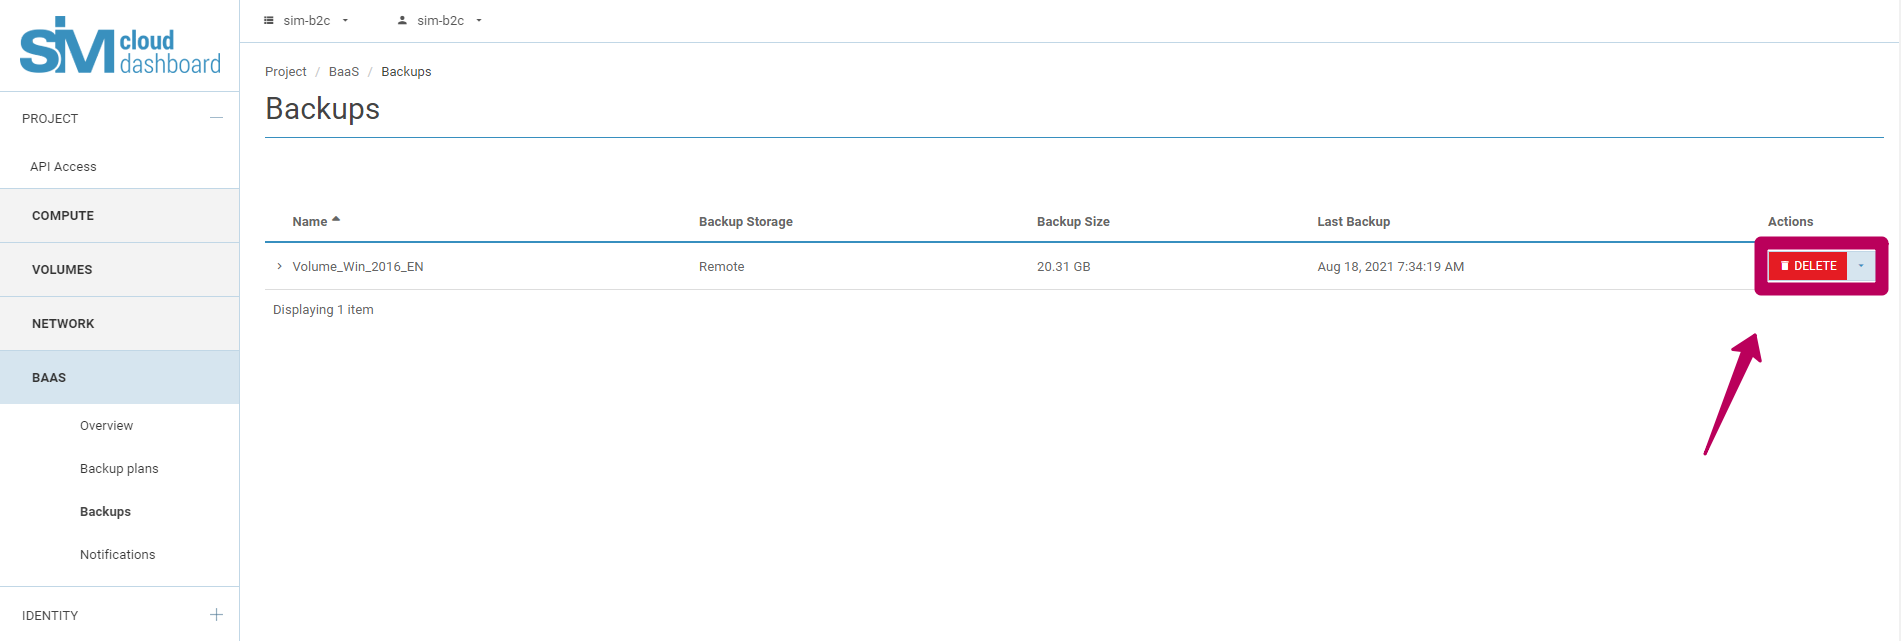
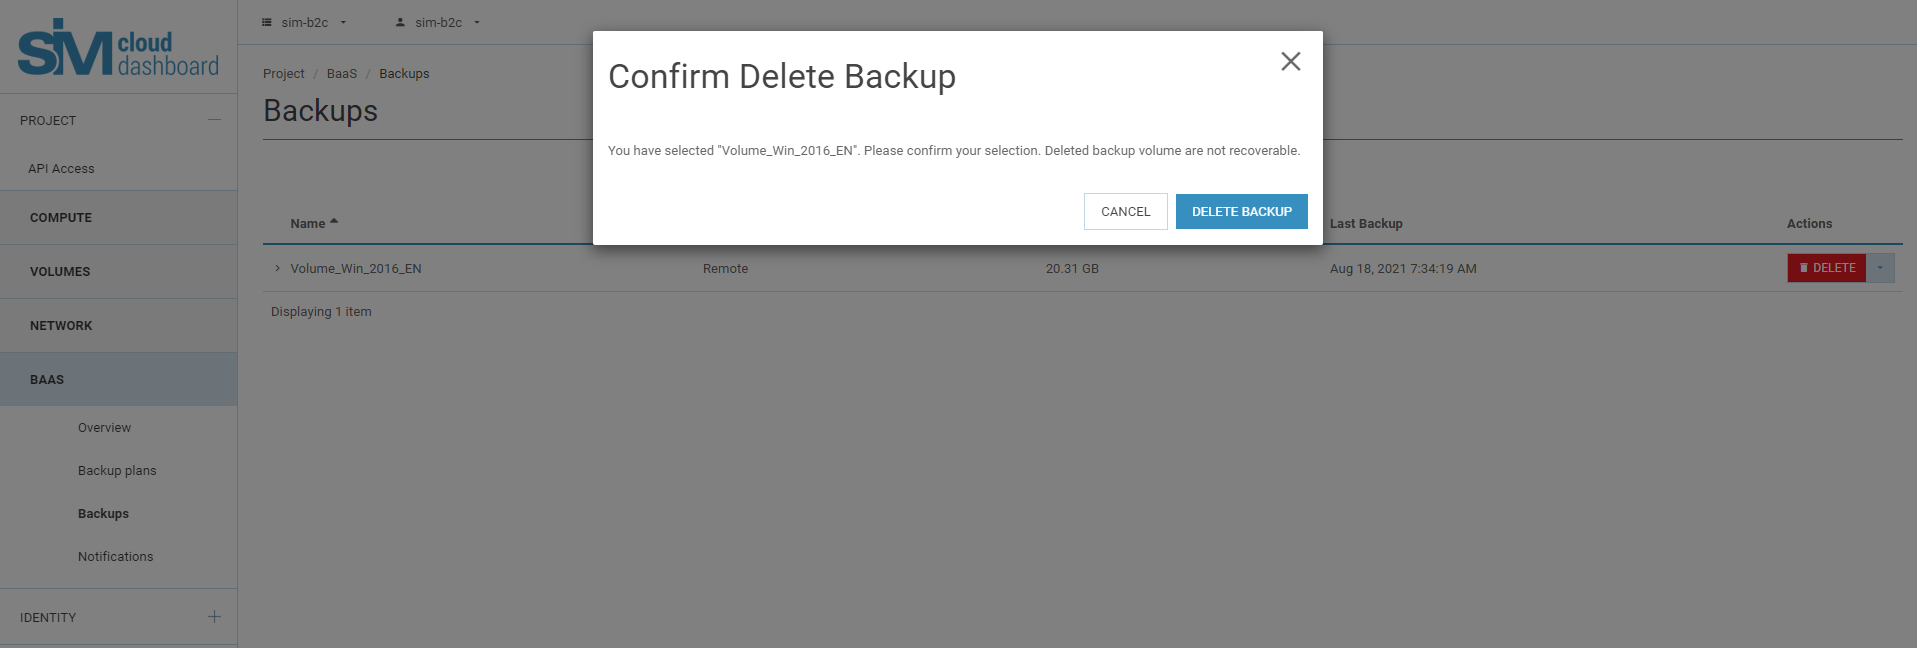
After pressing the Delete button a confirmation prompt appears; to confirm the deletion, press ‘Delete backups’.
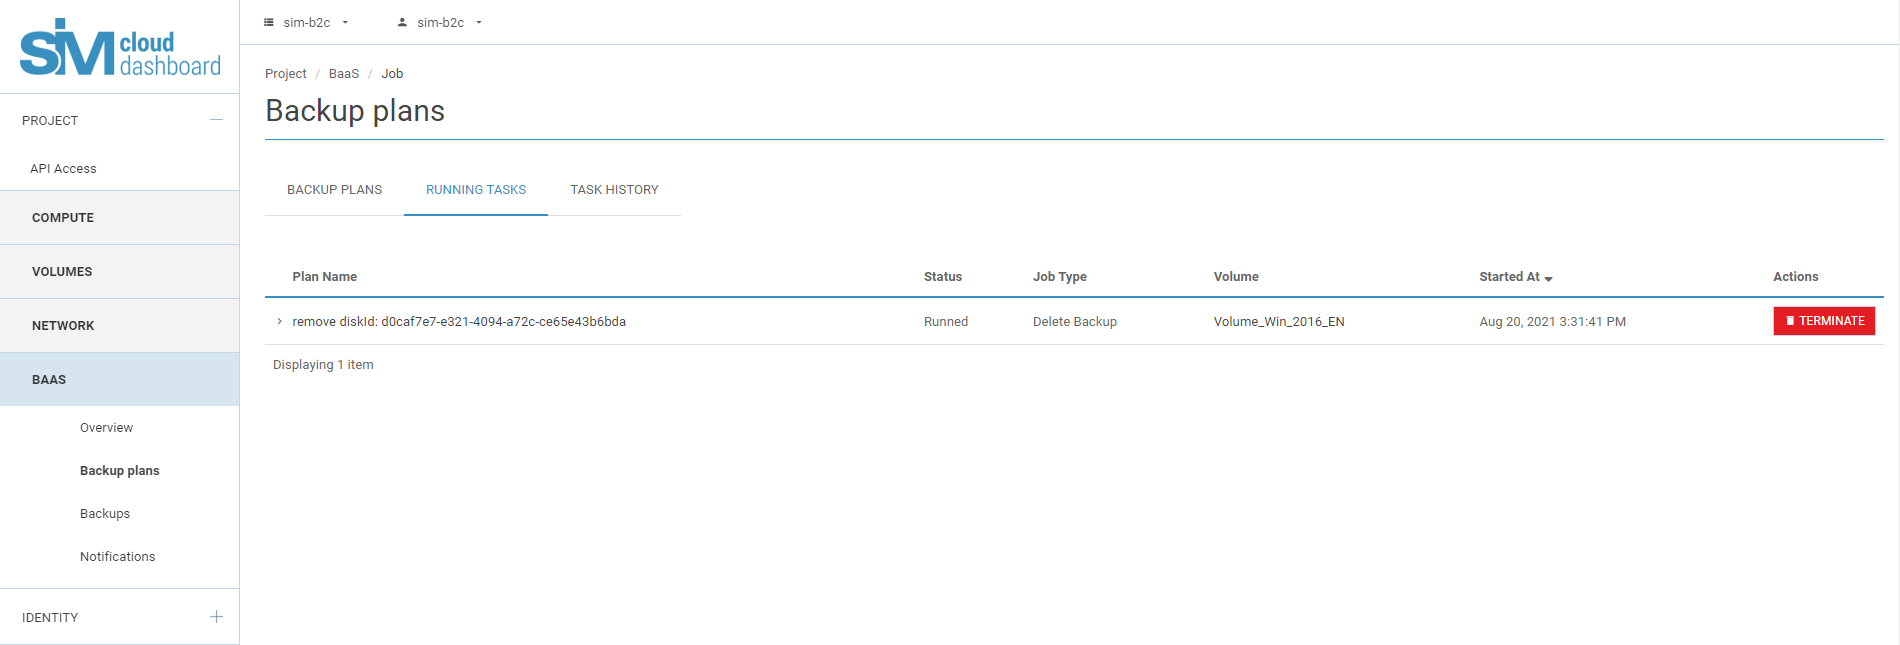
The active deletion task now running now appears in the Tasks and Overview sections:
Successful deletion will remove all restore points.
Warning
Deleting backup copies is an irreversible process and once you have confirmed the delete operation, they cannot be recovered.
Disconnecting a disk
To disconnect a disk, select the appropriate line containing the name of the disk from the list, press the button for the drop-down list and select Disconnect disk:
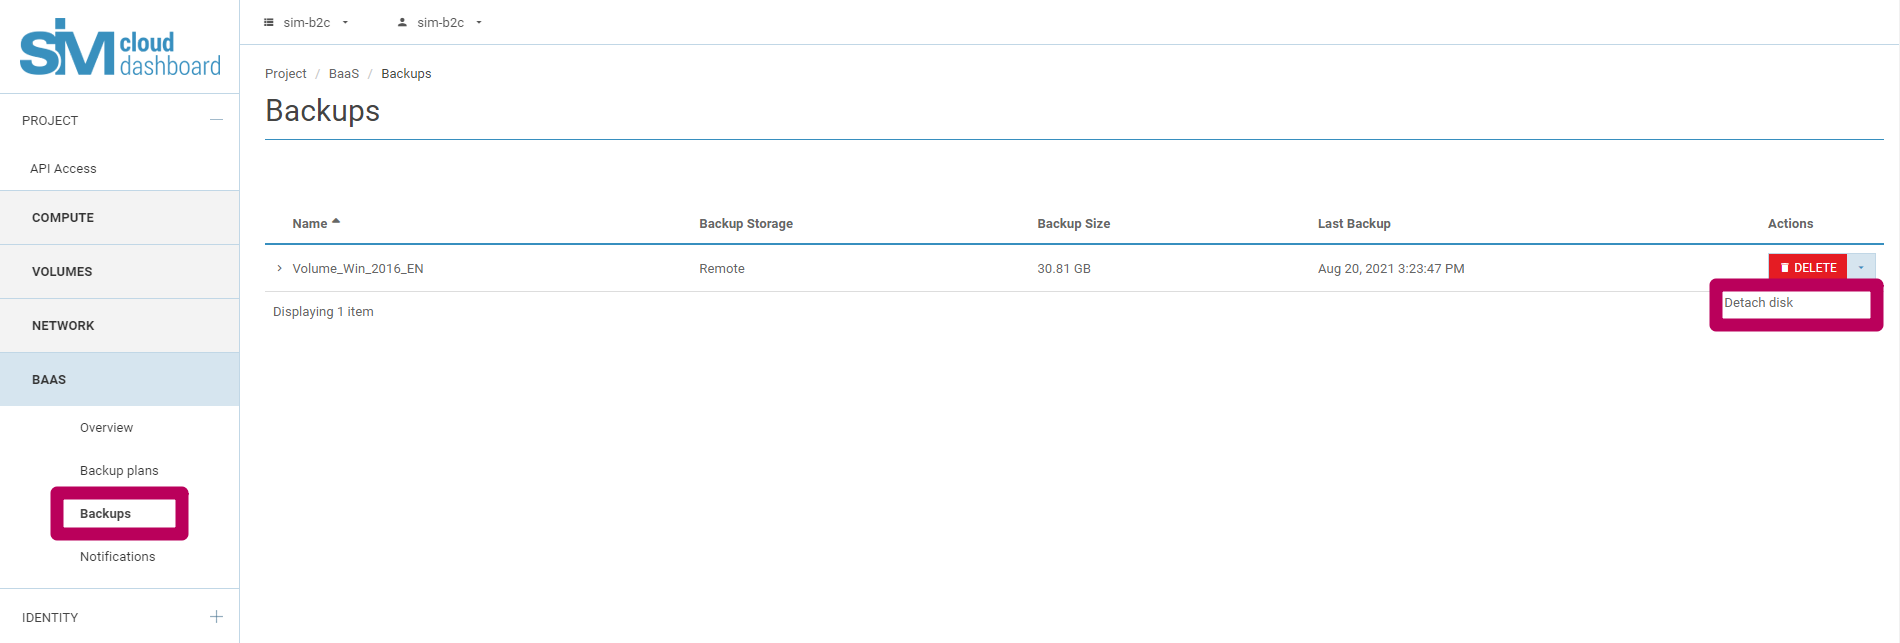
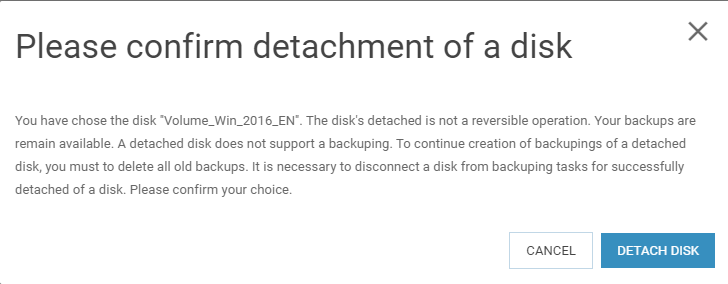
A confirmation prompt opens; confirm by clicking Disconnect Disk:
Note
Disconnection of the disk takes place even while the backup plan is being edited, if the service user unticks the checkbox beside the disk for which he had set up the backup plan.
Warning
Disconnecting the disk is an irreversible operation. Your backups remain accessible. A disconnected disk does not support backup operations. To continue to create backups of the disconnected disk, first delete all old backup copies. To successfully disconnect the disk it is important to disable the disk for backup tasks.
Notifications
The notification service is described in our article Backup notifications (BaaS)
The SIM-Networks team of developers works constantly to create new ways to increase the productivity of the SIM-Cloud BaaS, together with its stability and security.
Restrictions
The BaaS backup service does not keep a count and does not display the volume of restore points.
This means that the service does not include information about the volume of individual incremental restore points, nor of the full copy of the volume. Accordingly, it is not possible to assess the changes in used space broken down by restore point and to make estimations or predictions on this basis for selecting an accurate quota of backup storage.
Why is this so?
Our experience of use of a backup service based on incremental backups shows that the changes between restore points, delta, changes constantly and does not have clear patterns. The delta of changes between points may vary between a few megabytes and tens or hundreds of gigabytes. It is therefore important to understand that the changes are tracked not just of individual files but of the blocks of a volume. Blocks that have changed between launches of the tasks also contain a delta that is liable to backup.
What could affect the volume of incremental restore points?
Updates to the operating system (OS).
Software updates.
Defragmentation of the volume.
Data archiving.
Change of file system.
Extending a disk.
Intensive user activity in a web browser.
Use of the disk for file-swapping and many other factors.
Thus, given the insufficient level of information and the lack of adequate use of the mechanism for counting the size of incremental restore points, we recommend that you use a coefficient of approximately 1.5 (thus for a disk size of 500 GB we would recommend about 750 GB of BaaS; this volume should be sufficient for 3-5 restore points).
- One volume connects only to one storage, either local or remote. The current functionality of the BaaS service does not offer the possibility of connecting a volume to multiple backup storages.
- If a volume already contains backup restore points in one of the BaaS storages, it can be connected to a new storage only after the existing restore points have been deleted. A change of storage for a volume is only possible by deleting the backups on the previous storage.
- The maximum number of restore points: 30.
- The BaaS backup service is not recommended for software RAID arrays used in an alternation mechanism: such as RAID 0 (striping) or similar. This is because a backup copy of disks is made in a queuing mode and cannot be executed simultaneously. During disk recovery the integrity of the RAID array and thus that of the data may be compromised.
- The BaaS backup service is not recommended for use with disks that are encrypted using third-party software. This is because if an encrypted disk is recovered, the specialist software may carry out a check of the ID device, the disk, to protect against the disk being substituted. This results in the disk being restored, but not being useable. In such cases we recommend that you learn the disk encryption algorithms used by the software beforehand and carry out a preliminary test.