Migration with “Virt-V2V”
- Description
- Basic information
- Using a prepared image
- How to prepare your server for migration
- System disk migration
- Migrating an additional data disk
Description
This article describes one of the possible ways to migrate virtual machines user to the infrastructure of the SIM-Cloud project. In this example, the algorithm of actions for performing the migration will be described. virtual servers from the ESXi hypervisor (Version: 6.7.0 (Build 8169922)). This article describes the implementation of virtio drivers on Windows OS using specialized software “virt-v2v”, in more detail this application can be found on the vendor’s website - Red Hat V2V GUIDE
In order to independently perform the migration of the guest machine to the user there are two options available:
- Use the prepared image of the system, which is in the list of available SIM-Cloud images.
- Install your copy of the system for converting and then importing disks into the SIM-Cloud service project.
The use of these materials requires skills system administration OS of the Linux and Windows families. In addition, the materials of the article are designed for users who have an understanding of main features of the SIM-Cloud service management interface - Dashboard, and also got acquainted with thematic articles:
- Quick start
- OS images
- Volume operations
- Attaching an additional drive to an instance
- Connecting an additional disk to a Linux server
Basic information
Migration of a virtual server to SIM-Cloud implies the need to copy the system disk (on which the operating system is installed - OS), as well as additional connected drives to the guest machine from the existing virtualization system to the client’s cloud project.
Prerequisites for copying discs to the Cloud: - Removing the VMware Tools application from the guest system. - Change the format of the disk image to “raw”. - Installing virtio drivers to provide the ability to run an instance on KVM.
| NetKVM | Virtio network driver |
| Viostor | Virtio block driver |
| Vioscsi | Virtio Small Computer System Interface (SCSI) driver |
| Vioser | Virtio serial driver |
| Balloon | Virtio memory balloon driver |
More details about the Virtio drivers used can be found on the website website developer.
After the disks are prepared, they must be copied to the “SIM-Cloud” project. For this operation, the Linux OS commands will be used: “dd” or “cat”, depending on from the task. In this case, the data of the prepared disk will be copied “byte-by-byte” to the disk device - a volume that will be connected to an existing instance in the Cloud.
Migrating a system disk image and a data disk image is different.
System disk migration
For the system disk, you need to run:
- removal of VMware Tools;
- make sure there is free disk space (for installing drivers);
- Convert disk to raw format;
- installation of additional virtio drivers;
- copying the finished image to the SIM-Cloud service project.
Migrating an additional data disk
To prepare a data disk, you need to do:
- Convert disk to “raw” format;
- copying the finished image to the SIM-Cloud service project.
No installation required when preparing a data disc image additional drivers, since this disk will be connected to the instance, which already has all the necessary drivers and will be able to correctly determine the new one additional disk.
Migration using a pre-installed “SIM-V2V” -image
- Launching the “SIM-V2V” instance
- Connecting an additional disk
- Mapping a disk in the OS instance
- Connecting to VMWare and copying guest disks
- Installing drivers for the system drive
- Converting additional drives
- Creating and mounting a bootable system disk
- Copying a system disk image to a new disk
- Disconnecting the disk to which the system disk was copied
- Setting the option - “Boot” for the system disk
- Attaching additional drives to create data discs
- Copying prepared data disk images
- Disconnecting additional drives
- Instance launch
- Installing the required virtio drivers and guest agent
- Attaching additional data drives to the instance
- Checking the Results of Virtual Machine Migration
Using a prepared image
Let’s consider the option of using an already prepared image.
The SIM-Cloud team has prepared a system image that allows promptly start performing work on the migration of the virtual server to the project SIM-Cloud.
System image “SIM-V2V” implemented on the basis of the distribution GNU Linux Centos 7.4 [EN], which is also available in the public list SIM-Cloud Images.
OS access parameters: User: root Password: sim-v2v
Note
Within the framework of the security organization, after the first successful authorization, the system will offer to perform a mandatory password change.
Launching the “SIM-V2V” instance
- Launching an instance based on the prepared SIM-V2V image.
The process of creating an instance is described in the topic article. Quick start.
Note
Recommendations: when creating an instance, we recommend using the type an instance that, in terms of its computational characteristics, is not less than than the type “SIM-A1” (2 vCPU / 4 GB RAM), while the amount of storage under system disk - 10 GB (gs1).
Connecting an additional disk
- Attaching an additional disk to the instance that will be used for storing virtual disks of guest machines, as well as those already converted, prepared disks.
After deploying an instance running OS “CentOS Linux 7”, to this the virtual machine needs to connect an additional storage-based disk gs1.
The size of the additional disk should be selected based on the actual full the size of the disk image to be migrated plus an additional disk space equal to at least 150% of the image volume. For example, if the disk image is 200GB, then the disk that needs to be connected to the instance should be roughly 500GB (200GB + 300GB). Additional space is required to store the prepared converted image, which will later be transferred to a separate the block device from which the instance will be created. The process of connecting an additional disk to an instance is described in our thematic article.
Mapping a disk in the OS instance
- Connecting a new additional disk in the OS instance.
An example of the process of connecting an additional disk in OS Linux is described in the topic article.
Connecting to VMWare and copying guest disks
- Connecting the instance to the VMWare hypervisor to copy the disks of the guest machine.
At this stage, connecting to the esxi server, copying disks virtual machine and converting the copied disks to “raw” format. By default, the v2v service copies all disks connected to the virtual machine. You must first go to the directory where you will copy disks.
cd /data
Note
Before you start copying an image from ESXi, you must:
- Remove the VMware Tools application from the OS of the guest machine. If your system does not have this component, simply skip this step. To uninstall the application, follow the path “Start” → “Panel management “→” Programs and Features “, select from the list VMware Tools and click Remove.
- After the VMware Tools utility is uninstalled, the virtual the machine (VM) must be turned off. If the VM is not previously turned off, copying the disk image will not start.
Example of connecting to a remote ESXi hypervisor:
Attention
After running the command to copy the guest machine from the server esxi, at service request (“Enter host password for user ‘user_esxi’:”) it is necessary to enter the user password several times, under which a connection occurs.
virt-v2v-copy-to-local -ic esx://user_esxi@esxi_n.sim-networks.net 2012_v2v
[   0,0] Fetching the remote libvirt XML metadata ...
2019-02-12 10:31:24.317+0000: 19144: info : libvirt version: 4.5.0, package: 10.el7_6.4 (CentOS BuildSystem <http://bugs.centos.org>, 2019-01-29-17:31:22, x86-01.bsys.centos.org)
2019-02-12 10:31:24.317+0000: 19144: info : hostname: v2v-prod
2019-02-12 10:31:24.317+0000: 19144: warning : esxConnectOpen:857 : Ignoring unexpected path '' for non-vpx scheme 'esx'
Enter user_esxi's password for esxi_n.sim-networks.net:
[   6,9] Parsing the remote libvirt XML metadata ...
Enter host password for user 'user_esxi':
Enter host password for user 'user_esxi':
Enter host password for user 'user_esxi':
Enter host password for user 'user_esxi':
[  29,6] Copying remote disk 1/2 to 2012_v2v-disk1
  % Total    % Received % Xferd  Average Speed   Time    Time     Time  Current
                                 Dload  Upload   Total   Spent    Left  Speed
100 40.0G  100 40.0G    0     0  86.9M      0  0:07:50  0:07:50 --:--:-- 87.8M
[ 500,5] Copying remote disk 2/2 to 2012_v2v-disk2
  % Total    % Received % Xferd  Average Speed   Time    Time     Time  Current
                                 Dload  Upload   Total   Spent    Left  Speed
100 10.0G  100 10.0G    0     0  86.0M      0  0:01:59  0:01:59 --:--:-- 88.8M
[ 619,6] Writing libvirt XML metadata to 2012_v2v.xml ...
[ 619,6] Finishing off


"user_esxi" - the name of the user who has the ability to remote
              connect to esxi server via ssh.

"esxi_n.sim-networks.net" - FQDN of the remote esxi server to which it is running
                            connection.

"2012_v2v" - the name of the guest machine (VM).

"-v -x" - additional optional keys for displaying debug information.

If you need to display additional debug information, the command can be run
with the "-v -x" keys.

Example: virt-v2v-copy-to-local -ic esx://user_esxi@esxi_n.sim-networks.net 2012_v2v  -v -x
Note
If the ESXi server to connect to uses a “self-signed” certificate, the connection to it does not occur. When trying to connect, the user gets an error: “libvirt: ESX Driver error : internal error: curl_easy_perform() returned an error: Peer certificate cannot be authenticated with given CA certificates (60) : Peer’s certificate issuer has been marked as not trusted by the user”.
To eliminate this error, you need to use the command format: “esx://example-esx.com/?no_verify=1”.
Example: “virt-v2v-copy-to-local -ic esx://user_esxi@esxi_n.sim-networks.net/?no_verify=1 2012_v2v -v -x”
Note
The disk image copy time will take some time and will depend on the size of the disk being copied and the speed of the connection with esxi server. During copying, the v2v service will display the current state the copying process, and the number of discs removed to copy.
Сheck the copied disk images.
Using the “ls -lh” command, we check the presence and size of files:
ls -lh /data
total 51G
-rw-r--r--. 1 root root  40G Feb 12 11:39 2012_v2v-disk1
-rw-r--r--. 1 root root  10G Feb 12 11:41 2012_v2v-disk2
-rw-r--r--. 1 root root 1,4K Feb 12 11:41 2012_v2v.xml
drwx------. 2 root root  16K Feb 12 10:56 lost+found

"2012_v2v-disk1" - Системный диск, объем 40G.
"2012_v2v-disk2" - Диск с данными, объем 10G.
Check the file format using the “qemu-img info” command:
qemu-img info 2012_v2v-disk1
image: 2012_v2v-disk1
file format: raw
virtual size: 40G (42949672960 bytes)
disk size: 40G

qemu-img info 2012_v2v-disk2
image: 2012_v2v-disk2
file format: raw
virtual size: 10G (10737418240 bytes)
disk size: 10G
As you can see from the output, the files have the correct “raw” format and size.
Installing drivers for the system drive
- Converting and installing drivers for the system disk.
At this stage, you need to install the virtio drivers for the system disks running OS Windows. At the same time, system disks running OS Linux do not need additional installing virtio drivers.
“Virt-v2v” software allows you to automatically implement the “virtio” driver based on the Windows OS version. An important feature and, as a consequence, the advantage of this solution is that service “virt-v2v” independently determines the version and type of OS MS Windows, after which the required drivers are being installed.
An example of converting a system disk running OS Windows Server 2012 Standard:
virt-v2v  -i disk /data/2012_v2v-disk1 -o local -os /data
[   0,0] Opening the source -i disk /data/2012_v2v-disk1
[   0,0] Creating an overlay to protect the source from being modified
[   0,1] Initializing the target -o local -os /data
[   0,1] Opening the overlay
[  45,5] Inspecting the overlay
[  49,1] Checking for sufficient free disk space in the guest
[  49,1] Estimating space required on target for each disk
[  49,1] Converting Windows Server 2012 Standard Evaluation to run on KVM
virt-v2v: warning: /usr/share/virt-tools/pnp_wait.exe is missing.
Firstboot scripts may conflict with PnP.
virt-v2v: warning: there is no QXL driver for this version of Windows (6.2
x86_64).  virt-v2v looks for this driver in
/usr/share/virtio-win/virtio-win.iso

The guest will be configured to use a basic VGA display driver.
virt-v2v: This guest has virtio drivers installed.
[  66,4] Mapping filesystem data to avoid copying unused and blank areas
[  67,2] Closing the overlay
[  67,5] Checking if the guest needs BIOS or UEFI to boot
[  67,5] Assigning disks to buses
[  67,5] Copying disk 1/1 to /data/2012_v2v-disk1-sda (raw)
    (100.00/100%)
[ 383,7] Creating output metadata
[ 383,7] Finishing off
Note
Please note that during the installation of the drivers, the “v2v” service does not found video drivers and as a result the standard VGA driver. Video drivers were intentionally removed as their installation led to incorrect processing the GUI of the guest machine (the image was displayed in inverted mirror view). For this reason, we strongly advise against installing video drivers!
After the installation of the drivers is complete and the conversion of the disk is complete, we perform checking for the existence of the required file:
ls -lh /data
total 59G
-rw-r--r--. 1 qemu qemu  40G Feb 12 11:39 2012_v2v-disk1
-rw-r--r--. 1 root root  40G Feb 12 12:41 2012_v2v-disk1-sda
-rw-r--r--. 1 root root 1,3K Feb 12 12:41 2012_v2v-disk1.xml
-rw-r--r--. 1 root root  10G Feb 12 11:41 2012_v2v-disk2
-rw-r--r--. 1 root root 1,4K Feb 12 11:41 2012_v2v.xml
drwx------. 2 root root  16K Feb 12 10:56 lost+found

"2012_v2v-disk1-sda" - подготовленный диск с установленными драйверами.
Checking the file format:
qemu-img info 2012_v2v-disk1-sda
image: 2012_v2v-disk1-sda
file format: raw
virtual size: 40G (42949672960 bytes)
disk size: 8.1G
Converting additional drives
- Converting additional data disks.
Additional disks that were copied while connecting to the hypervisor do not need additional processing or conversion. Immediately after copying, additional (non-system) disks are already in the required format is “raw”.
Creating and mounting a bootable system disk
- Connecting an additional disk to create a bootable system disk.
To create a new disk from which the instance will be launched or which will be used as an additional one, you must first define it volume. If you specify a disk size less than the nominal disk size for import, then the next stage of copying will end with an error, if the disk is too large, then its use will not be rational.
To determine the required volume, it is necessary to calculate the volume of the already prepared to disk migration using the command “ls -lh <filename>”
ls -lh 2012_v2v-disk1-sda
-rw-r--r--. 1 root root 40G Feb 12 12:41 2012_v2v-disk1-sda
In this case, the size of the file “2012_v2v-disk1-sda” (prepared for migration system disk) is 40G. Therefore, a new disk needs to be created with a size of 40G.
The disc creation process is described in article Thus it is necessary to create a blank disk. The created disk needs to be connected to the v2v instance (similar to the process described earlier).
After adding a new 40G disk, check the disk availability in the OS:
fdisk -l
Disk /dev/vdc: 42.9 GB, 42949672960 bytes, 83886080 sectors
Units = sectors of 1 * 512 = 512 bytes
Sector size (logical/physical): 512 bytes / 512 bytes
I/O size (minimum/optimal): 512 bytes / 512 bytes
The disk “/dev/vdc” is available, the disk can be used.
Copying a system disk image to a new disk
- Copying the prepared system disk image to a new secondary disk.
Since all disks are connected to one instance running OS Linux, copying the disk image will be executed locally using the “dd” utility.
An example of copying a disk image to a separate device “/dev/vdc”:
dd if=/data/2012_v2v-disk1-sda of=/dev/vdc bs=32M
1280+0 records in
1280+0 records out
42949672960 bytes (43 GB) copied, 172,71 s, 249 MB/s
The disk image was successfully copied to the “/dev/vdc” block device.
Disconnecting the disk to which the system disk was copied
- Disconnect the additional disk to which the system disk was copied.
After successfully copying the disk image, the block device to which copying was carried out, you need to turn it off, since in the future from this volume there will be a new instance is launched. As an example (in our case) we disconnect the “/dev/vdc” device.
The process of disconnecting a disk from an instance is described in our documentation. “Unmounting a disk”
Setting the option - “Boot” for the system disk
- Changing the system disk settings - setting the option - “Bootable”.
- Performing disk editing *
This requires: - Go to the “Disks” menu, then select the “Disks” item. - In the column “Actions” from the drop-down list, select the item “Edit disk”. - In the dialog box that opens, you need to set the “Boot” flag.
Attaching additional drives to create data discs
- Attach additional disks to the instance to create data disks.
This item is relevant if there are additional disks and the need for migration of additional disks. If there is a need to copy an additional disc, please refer to recommendations from point 7.
Copying prepared data disk images
- Copying prepared data disk images to new additional disks.
Technically, the process of copying an additional data disk image is no different. from copying the system disk.
In our example, we will copy an additional disk “2012_v2v-disk2”, which was copied at the stage of connecting to the hypervisor (menu item 4):
dd if=/data/2012_v2v-disk2 of=/dev/vdc bs=32M

320+0 records in
320+0 records out
10737418240 bytes (11 GB) copied, 79,7397 s, 135 MB/s
Data disc copied successfully.
Disconnecting additional drives
- Disconnect additional disks to which data disks were copied.
The process of disconnecting a disk from an instance is described in our documentation. “Unmounting a disk” As an example (in our case) we disconnect the “/dev/vdc” device.
Instance launch
- Launching an instance based on a prepared boot disk.
Following the above steps step by step, we performed copying discs the guest machine “2012_v2v”, which is hosted on the server “esxi_n.sim-networks.net”.
Now that the Clouds project has analogues of the “2012_v2v” server disks, we we can start running a copy (“clone”) of this server, for this you need based on the copied system disk, start a new instance, and after it successful start, connect additional disks.
Installing the required virtio drivers and guest agent
- Completing the installation of the required virtio drivers and the guest agent - “qemu-ga-x64 в OS Windows.
Installing virtio drivers and qemu-agent
After successfully loading the instance, it is necessary to install an additional software that will ensure the stable operation of the virtual machine and its further management using the services of the Openstack platform:
- Balloon
- NetKVM
- guest-agent.
Installation of additional drivers is performed as needed.
To install the drivers, you need to call the OS Windows device manager and by clicking right-click on the device (for which you need to install the driver), select the item “Update drivers …”. Select the “Ethernet controller” device:
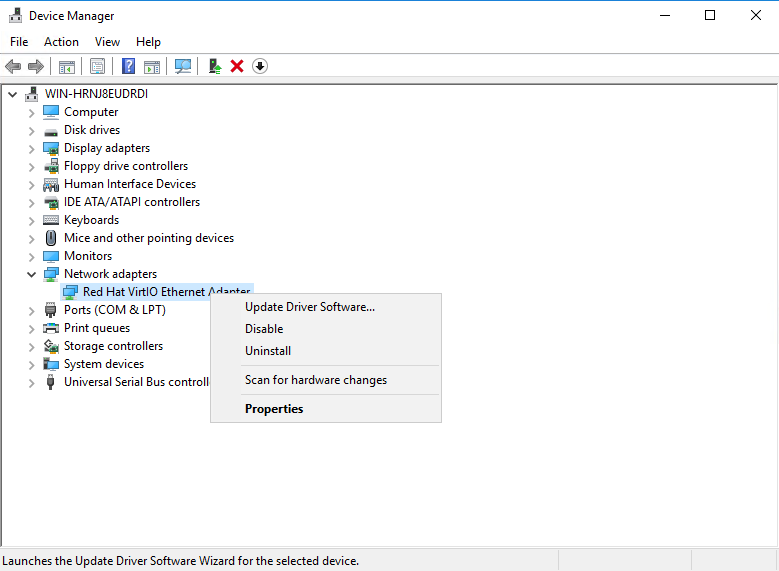
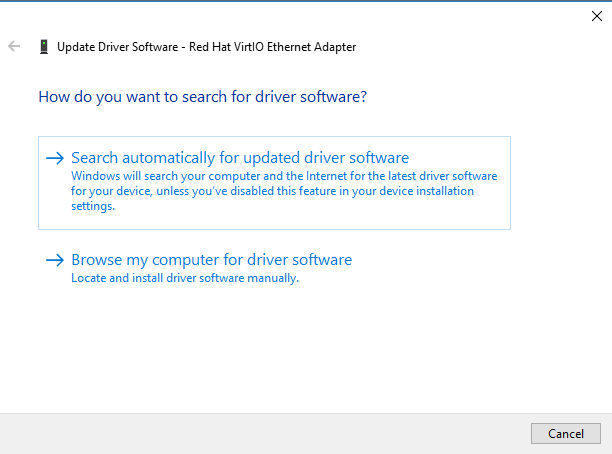
In the “Driver Update - Ethernet Controller” window that opens, select the item “Search for drivers on this computer.”
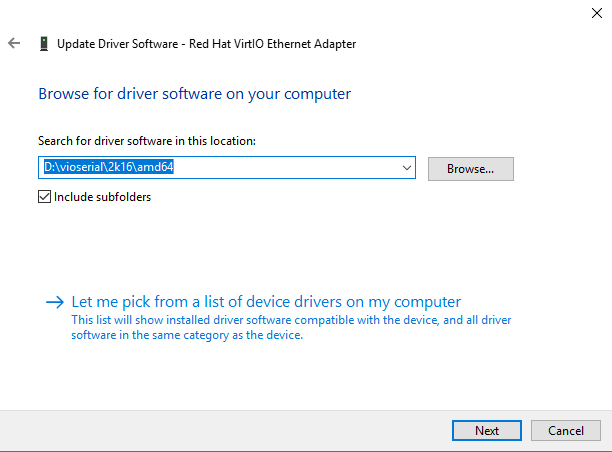
In the next window “Search for drivers on this computer” select the bottom item - “Select a driver from the list of already installed drivers”, click the “Next” button.
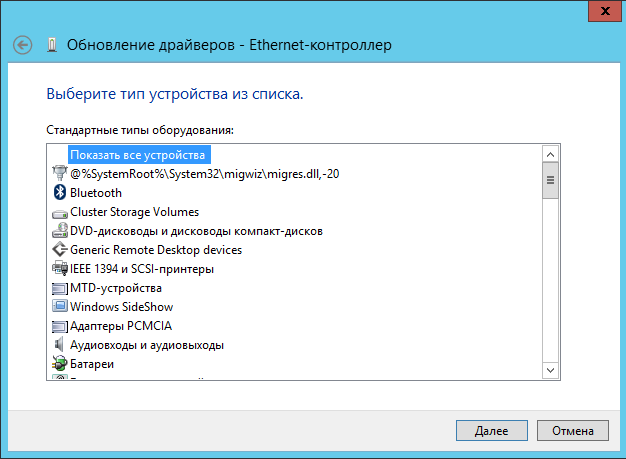
In the “Select device type from the list” window, we leave the default item “Show all devices”, click the “Next” button.
In the new window “Select a driver for this device”, the system will display the available driver “Red Hat VirtIO Ethernet Adapter”, click the “Next” button.
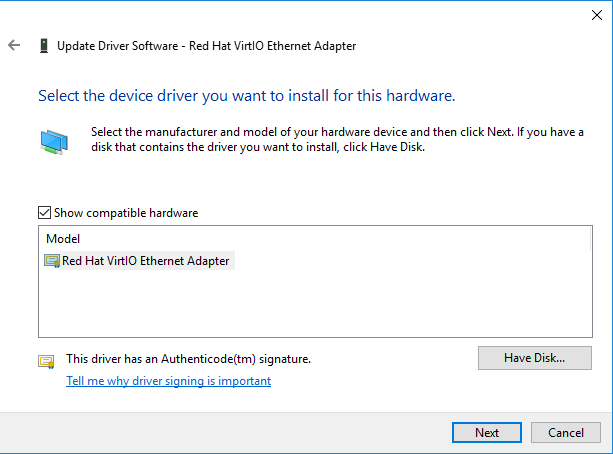
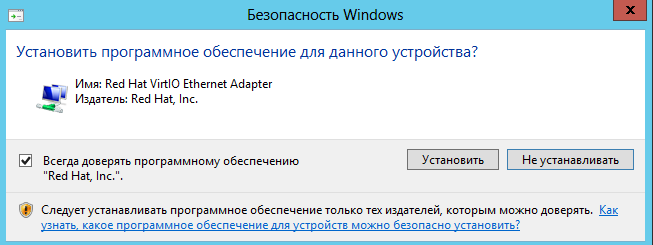
In the “Windows Security” confirmation window, check box must be installed next to the option “Always trust Red Hat, Inc. software.” press the “Next” button.
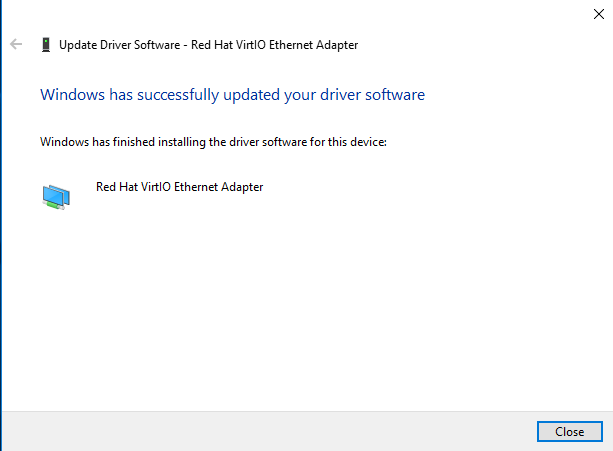
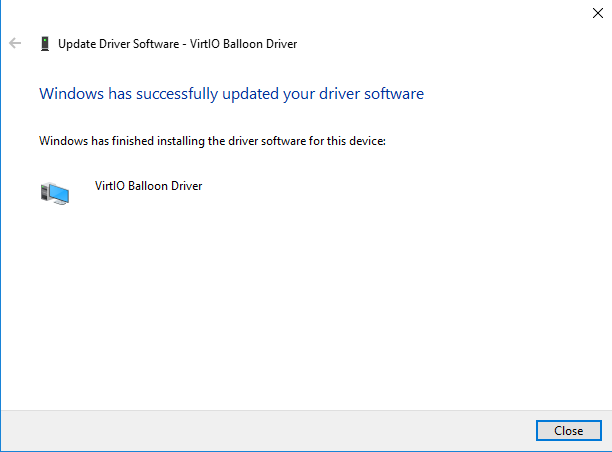
From the next window “Updating the software for this unit completed successfully “we see that the driver has been successfully installed on the network equipment.
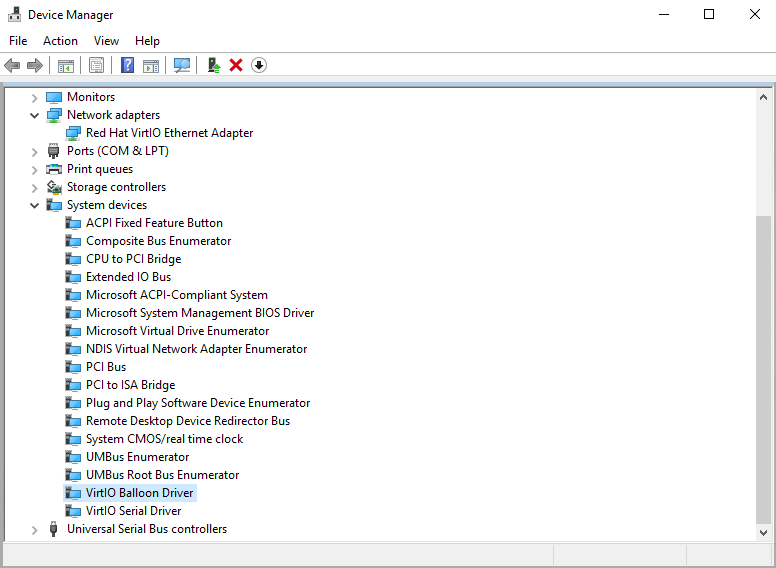
Similar steps must be performed for the PCI device. In this case, the installation of the “VirtIO Balloon Driver” will be performed.
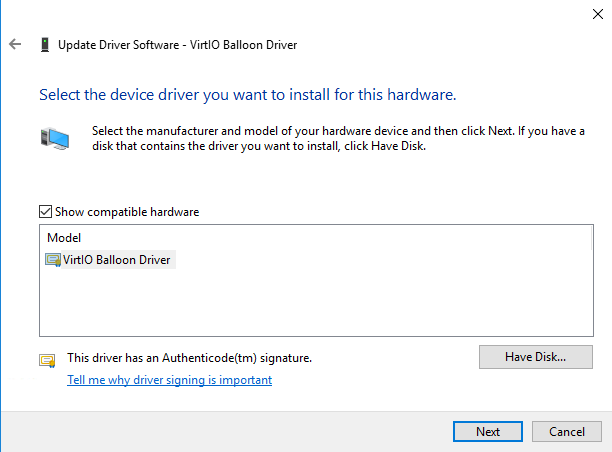
The PCI device driver “VirtIO Balloon Driver” has been successfully installed.
All drivers have been successfully installed, there is no more in the “Other devices” section devices without drivers.
After all the necessary drivers are installed, you need to perform installation qemu-guest-agent. To install the agent, you need to download a stable iso-image “Stable virtio-win iso”, which is available by link After the image is downloaded, you need to install the agent “qemu-ga-x64.msi” the installation file is located in the “guest-agent” directory. The installation process is running by default, without the need to specify additional parameters.
Attaching additional data drives to the instance
- Attaching additional data disks to the new instance.
Connecting additional disks is performed according to the article from our documentation - Attaching an additional drive to an instance.
Checking the Results of Virtual Machine Migration
- Checking the functioning of all services and services, licenses on the migrated server - instance. At this stage, the administrator who migrated the virtual server to the Cloud project, you need to perform a full server health check, resource availability, make changes related to changing IP addressing etc. This check is necessary in order to make sure that after the performed everything works correctly.
How to prepare your server for migration
Deploying the system
In fact, to deploy the service, you need to install several software packages and make changes to the iso image with drivers. During the demonstration of the example, the video drivers will be removed, after which a new iso image will be built, but without the “qxl” and “qxldod” directories (as mentioned earlier, using these drivers led to incorrect operation of the virtual device.)
Check for available OS updates:
yum check-update
Installing available updates for OS:
yum update -y
Installing the software
The “virt-v2v” package is installed under the “root” user:
yum install virt-v2v -y
Adding a new repository virtio-win.repo:
wget https://fedorapeople.org/groups/virt/virtio-win/virtio-win.repo -O /etc/yum.repos.d/virtio-win.repo
yum install virtio-win -y
Installing the “xorriso” package for creating iso images:
yum install xorriso -y
Mount the iso image “virtio-win-0.1.141.is” to the mount point “/ mnt”:
mount -o loop /usr/share/virtio-win/virtio-win-0.1.141.iso /mnt
We check the availability of data from a previously mounted image:
ls -lh /mnt/
total 5,7M
dr-xr-xr-x. 13 root root 2,0K Aug  4  2017 Balloon
dr-xr-xr-x.  2 root root 2,0K Aug  4  2017 guest-agent
dr-xr-xr-x. 13 root root 2,0K Aug  4  2017 NetKVM
dr-xr-xr-x. 11 root root 2,0K Aug  4  2017 pvpanic
dr-xr-xr-x.  4 root root 2,0K Aug  4  2017 qemufwcfg
dr-xr-xr-x. 11 root root 2,0K Aug  4  2017 qemupciserial
dr-xr-xr-x.  5 root root 2,0K Aug  4  2017 qxl
dr-xr-xr-x.  8 root root 2,0K Aug  4  2017 qxldod
dr-xr-xr-x.  3 root root 2,0K Aug  4  2017 smbus
dr-xr-xr-x. 10 root root 2,0K Aug  4  2017 vioinput
dr-xr-xr-x. 11 root root 2,0K Aug  4  2017 viorng
dr-xr-xr-x. 11 root root 2,0K Aug  4  2017 vioscsi
dr-xr-xr-x. 13 root root 2,0K Aug  4  2017 vioserial
dr-xr-xr-x. 13 root root 2,0K Aug  4  2017 viostor
-r--r--r--.  1 root root 2,9M Aug  4  2017 virtio-win-0.1.141_amd64.vfd
-r--r--r--.  1 root root 2,9M Aug  4  2017 virtio-win-0.1.141_x86.vfd
-r--r--r--.  1 root root  20K Aug  4  2017 virtio-win_license.txt
Create a new “iso” directory for further copying the contents into it iso image “virtio-win-0.1.141.iso”.
mkdir /data/iso
We go to the directory “/ mnt”:
cd /mnt
Copy all data from the image “virtio-win-0.1.141.iso” to the directory “/data/iso/”
cp -r /mnt/. /data/iso/
We check that all data has been copied correctly.
ls -lh /data/iso/
total 5,7M
dr-xr-xr-x. 13 root root 4,0K Feb  8 10:45 Balloon
dr-xr-xr-x.  2 root root 4,0K Feb  8 10:45 guest-agent
dr-xr-xr-x. 13 root root 4,0K Feb  8 10:45 NetKVM
dr-xr-xr-x. 11 root root 4,0K Feb  8 10:45 pvpanic
dr-xr-xr-x.  4 root root 4,0K Feb  8 10:45 qemufwcfg
dr-xr-xr-x. 11 root root 4,0K Feb  8 10:45 qemupciserial
dr-xr-xr-x.  5 root root 4,0K Feb  8 10:45 qxl
dr-xr-xr-x.  8 root root 4,0K Feb  8 10:45 qxldod
dr-xr-xr-x.  3 root root 4,0K Feb  8 10:45 smbus
dr-xr-xr-x. 10 root root 4,0K Feb  8 10:45 vioinput
dr-xr-xr-x. 11 root root 4,0K Feb  8 10:45 viorng
dr-xr-xr-x. 11 root root 4,0K Feb  8 10:45 vioscsi
dr-xr-xr-x. 13 root root 4,0K Feb  8 10:45 vioserial
dr-xr-xr-x. 13 root root 4,0K Feb  8 10:45 viostor
-r--r--r--.  1 root root 2,9M Feb  8 10:45 virtio-win-0.1.141_amd64.vfd
-r--r--r--.  1 root root 2,9M Feb  8 10:45 virtio-win-0.1.141_x86.vfd
-r--r--r--.  1 root root  20K Feb  8 10:45 virtio-win_license.txt
Remove the directories with video drivers (“qxl” and “qxldod”) from the directory “/data/iso/”:
rm -rf /data/iso/qxl
rm -rf /data/iso/qxldod
Check that the required directories have been deleted:
ls -lh /data/iso/
total 5,7M
dr-xr-xr-x. 13 root root 4,0K Feb  8 10:45 Balloon
dr-xr-xr-x.  2 root root 4,0K Feb  8 10:45 guest-agent
dr-xr-xr-x. 13 root root 4,0K Feb  8 10:45 NetKVM
dr-xr-xr-x. 11 root root 4,0K Feb  8 10:45 pvpanic
dr-xr-xr-x.  4 root root 4,0K Feb  8 10:45 qemufwcfg
dr-xr-xr-x. 11 root root 4,0K Feb  8 10:45 qemupciserial
dr-xr-xr-x.  3 root root 4,0K Feb  8 10:45 smbus
dr-xr-xr-x. 10 root root 4,0K Feb  8 10:45 vioinput
dr-xr-xr-x. 11 root root 4,0K Feb  8 10:45 viorng
dr-xr-xr-x. 11 root root 4,0K Feb  8 10:45 vioscsi
dr-xr-xr-x. 13 root root 4,0K Feb  8 10:45 vioserial
dr-xr-xr-x. 13 root root 4,0K Feb  8 10:45 viostor
-r--r--r--.  1 root root 2,9M Feb  8 10:45 virtio-win-0.1.141_amd64.vfd
-r--r--r--.  1 root root 2,9M Feb  8 10:45 virtio-win-0.1.141_x86.vfd
-r--r--r--.  1 root root  20K Feb  8 10:45 virtio-win_license.txt
Create an ISO image from files located in the “/data/iso/” directory, the iso file must be named “virtio-win-0.1.141.iso”:
xorrisofs -r -J -o /data/virtio-win-0.1.141.iso /data/iso/

xorriso 1.5.0 : RockRidge filesystem manipulator, libburnia project.

Drive current: -outdev 'stdio:/data/virtio-win-0.1.141.iso'
Media current: stdio file, overwriteable
Media status : is blank
Media summary: 0 sessions, 0 data blocks, 0 data,  186g free
Added to ISO image: directory '/'='/data/iso'
xorriso : UPDATE :     990 files added in 1 seconds
xorriso : UPDATE :     990 files added in 1 seconds
xorriso : UPDATE :  8.61% done
ISO image produced: 278601 sectors
Written to medium : 278601 sectors at LBA 0
Writing to 'stdio:/data/virtio-win-0.1.141.iso' completed successfully.
Check if the required ISO image has been created in the “/data” directory:
ls -lh /data
total 545M
drwxr-xr-x. 14 root root 4,0K Feb  8 10:54 iso
drwx------.  2 root root  16K Feb  8 10:37 lost+found
-rw-r--r--.  1 root root 545M Feb  8 10:58 virtio-win-0.1.141.iso
The required image has been successfully created.
We replace the original iso-image, which was in the directory “/ usr / share / virtio-win /” on the image that we created without video drivers. This requires:
- Unmount the image:
umount /mnt
- Go to the directory “/usr/share/virtio-win/” and delete the iso-image “virtio-win-0.1.141.iso”
cd /usr/share/virtio-win/
rm -f virtio-win-0.1.141.iso
- Сopy the iso-image prepared by us:
cp /data/virtio-win-0.1.141.iso .
- Delete the iso file from the /data/directory
rm -f /data/virtio-win-0.1.141.iso
- Delete the files from which the iso image was created:
rm -rf /data/iso/
Converting a disk in manual mode
Installed image software “SIM-V2V” allows you to convert virtual disks in the format “.vmdk” in format “raw” in manual mode from the local directory of the instance.
This method is applicable in the following cases:
- Отсутствует возможность подключения к серверу ESXi;
- It is necessary to perform a single conversion of a data disk or system disk;
- The user has only a certain list of virtual disks available, who need to migrate to the Cloud.
Copying the virtual server data
Example of remote connection to ESXi server, recursive directory copy with virtual machine files:
scp -r esxi_user@esxi_n.sim-networks.net:/vmfs/volumes/55343e73-583f862a-f32d-0cc47a13cce8/2012_v2v /data/
Password:
2012_v2v.vmx                    100% 3513     2.0MB/s   00:00
2012_v2v-flat.vmdk              100%   40GB  92.1MB/s   07:24
2012_v2v.vmdk                   100%  448   127.2KB/s   00:00
2012_v2v.vmsd                   100%    0     0.0KB/s   00:00
2012_v2v.nvram                  100% 8684     6.1MB/s   00:00
vmware-1.log                    100%  593KB  70.8MB/s   00:00
2012_v2v_1-flat.vmdk            100%   10GB  90.6MB/s   01:53
vmware-2.log                    100%  308KB  55.6MB/s   00:00
2012_v2v_1.vmdk                 100%  450   431.0KB/s   00:00
vmware.log                      100%  288KB  55.7MB/s   00:00
In this way, all files of the “2012_v2v” virtual machine were copied.
Check the copied files:
ls -lh /data/2012_v2v
total 51G
-rw-------. 1 root root  10G Feb 12 18:01 2012_v2v_1-flat.vmdk
-rw-------. 1 root root  450 Feb 12 18:01 2012_v2v_1.vmdk
-rw-------. 1 root root  40G Feb 12 17:59 2012_v2v-flat.vmdk
-rw-------. 1 root root 8,5K Feb 12 17:59 2012_v2v.nvram
-rw-------. 1 root root  448 Feb 12 17:59 2012_v2v.vmdk
-rw-r--r--. 1 root root    0 Feb 12 17:59 2012_v2v.vmsd
-rwxr-xr-x. 1 root root 3,5K Feb 12 17:52 2012_v2v.vmx
-rw-r--r--. 1 root root 593K Feb 12 17:59 vmware-1.log
-rw-r--r--. 1 root root 309K Feb 12 18:01 vmware-2.log
-rw-r--r--. 1 root root 289K Feb 12 18:01 vmware.log
The data has been copied in full.
Convert system disk
virt-v2v  -i disk  2012_v2v-flat.vmdk -o local -of raw -os  /data/2012_v2v/ -v -x
[   0,0] Opening the source -i disk 2012_v2v-flat.vmdk
[   0,0] Creating an overlay to protect the source from being modified
[   0,1] Initializing the target -o local -os /data/2012_v2v/
[   0,1] Opening the overlay
[   7,9] Inspecting the overlay
[  11,7] Checking for sufficient free disk space in the guest
[  11,7] Estimating space required on target for each disk
[  11,7] Converting Windows Server 2012 Standard Evaluation to run on KVM
virt-v2v: warning: /usr/share/virt-tools/pnp_wait.exe is missing.
Firstboot scripts may conflict with PnP.
virt-v2v: warning: there is no QXL driver for this version of Windows (6.2
x86_64).  virt-v2v looks for this driver in
/usr/share/virtio-win/virtio-win.iso

The guest will be configured to use a basic VGA display driver.
virt-v2v: This guest has virtio drivers installed.
[  29,3] Mapping filesystem data to avoid copying unused and blank areas
[  30,1] Closing the overlay
[  30,4] Checking if the guest needs BIOS or UEFI to boot
[  30,4] Assigning disks to buses
[  30,4] Copying disk 1/1 to /data/2012_v2v/2012_v2v-flat-sda (raw)
    (100.00/100%)
[ 343,4] Creating output metadata
[ 343,4] Finishing off
Checking the converted virtual disk file:
qemu-img info 2012_v2v-flat-sda
image: 2012_v2v-flat-sda
file format: raw
virtual size: 40G (42949672960 bytes)
disk size: 8.1G
The file has been successfully converted to the required format.
Converting a data disc
qemu-img convert -p -f vmdk -O raw 2012_v2v_1.vmdk disk.raw
(100.00/100%)
Data validation
qemu-img info disk.raw
image: disk.raw
file format: raw
virtual size: 10G (10737418240 bytes)
disk size: 54M
The file has been successfully converted to the required format.
The “qemu-img convert” utility supports the following conversion formats: vvfat vpc vmdk vhdx vdi ssh sheepdog rbd raw host_cdrom host_floppy host_device file qed qcow2 qcow parallels nbd iscsi gluster dmg tftp ftps ftp https http cloop bochs blkverify blkdebug
More information about the QEMU utility is available with the command: “qemu-img –help”.
After the disks are prepared (converted to the desired format and installed necessary virtio-drivers), they need to be copied to separate disks, and created from them instance. In the created instance, you must complete the installation of the virtio and qemu-agent drivers. All described actions were described in the previous paragraphs of this manual.